kfish
New member
I got bored and decided to port my blower myself. Took some pics along the way, figured I'd make up a how to on it.
First remove your fuel rail. Pull your fuel pump fuse and start the car, this will relieve the fuel pressure. Next disconnect your fuel lines on top of the blower. Im top swapped, so i can release my disconnects with just my fingers. If you have a GTP, you may need special quick disconnects tools. Once the lines are disconnected, go ahead and pull the vacuum line off the fuel pressure regulator. Next, there are 5 10mm nuts that need to be removed from the fuel rail. One is on top of the blower, the other 4 are at each corner of the fuel rail. Unplug each injector, and pop the rail off.
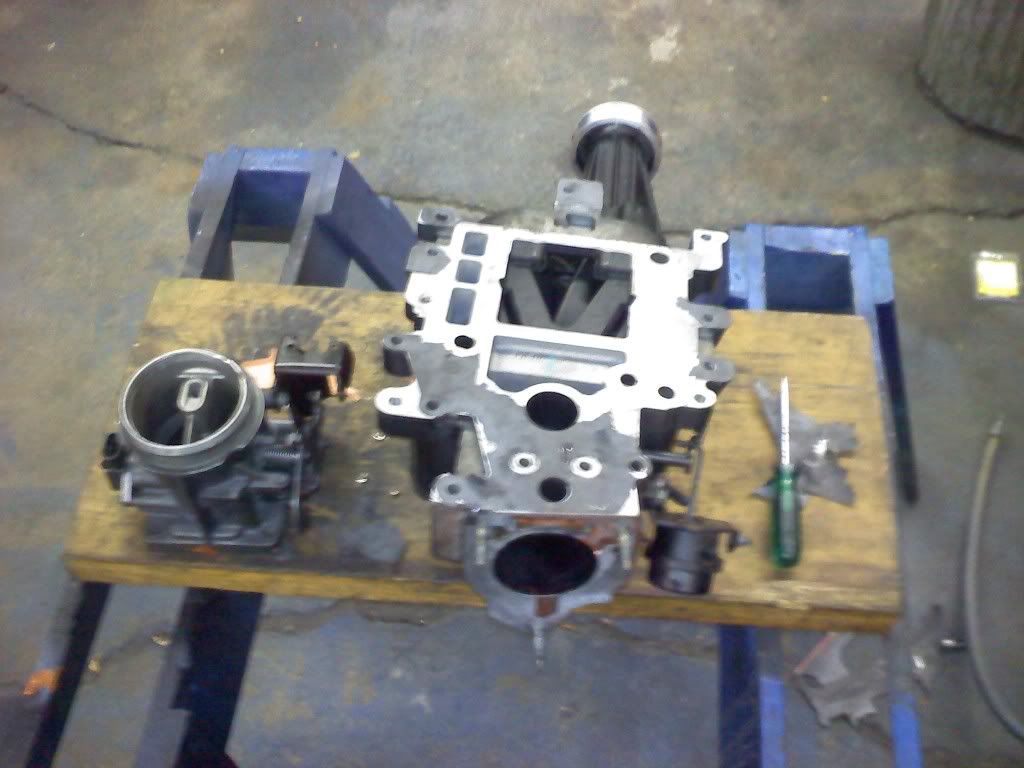
Now to get the blower off. Lets get the belt off first, you'll need a 15mm socket, just pop the socket on the tensioner and pull the belt off. Now, there is a spark plug wire seperator by the snout, youll need to release that and move it out of the way. Now you're gonna need your 10mm here as well. There is a stud on the throttle body end of the blower, which will need a deep socket for. The bolt that goes through right by the snout, is a tad longer than the rest. Keep that in mind. The rest are all the same length. When your taking all of the bolts at, try to go in a criss cross pattern to keep from warping the blower case. Double check everything, and make sure you got all the bolts out. Sometimes its easy to miss one. Now take your intake off of the throttle body, whether is stock, or open cone, or a FWI, take it off the throttle body. Alright! Now to pull the blower off. Grab it by the snout and pull up, it should pop loose, at the reat, grab the tb and lift up to pop it loose. Chances are your going to need a new gasket at this point. Once the supercharger is free on both ends, go ahead and lift it out. You'll have to lift up about 2" then slide it towards the passenger side and out from under the wire loom. Go set the blower on your bench, and pick up the yellow o rings that are on the drivers side of the lower intake and throw them away. Grab a "beverage", you've gotten your blower off.

Now to disassemble the supercharger, dont worry. Its easy. Grab your 10mm again, and take off all the bolts along the snout. I was lucky, ant my snout and rotors all came out in one piece, so i didnt lose any oil. Take some paper towel, and stuff down into the blower where the needle bearings are to keep debris from getting in. Now flip your supercharger over and take a look at what your going to be porting.

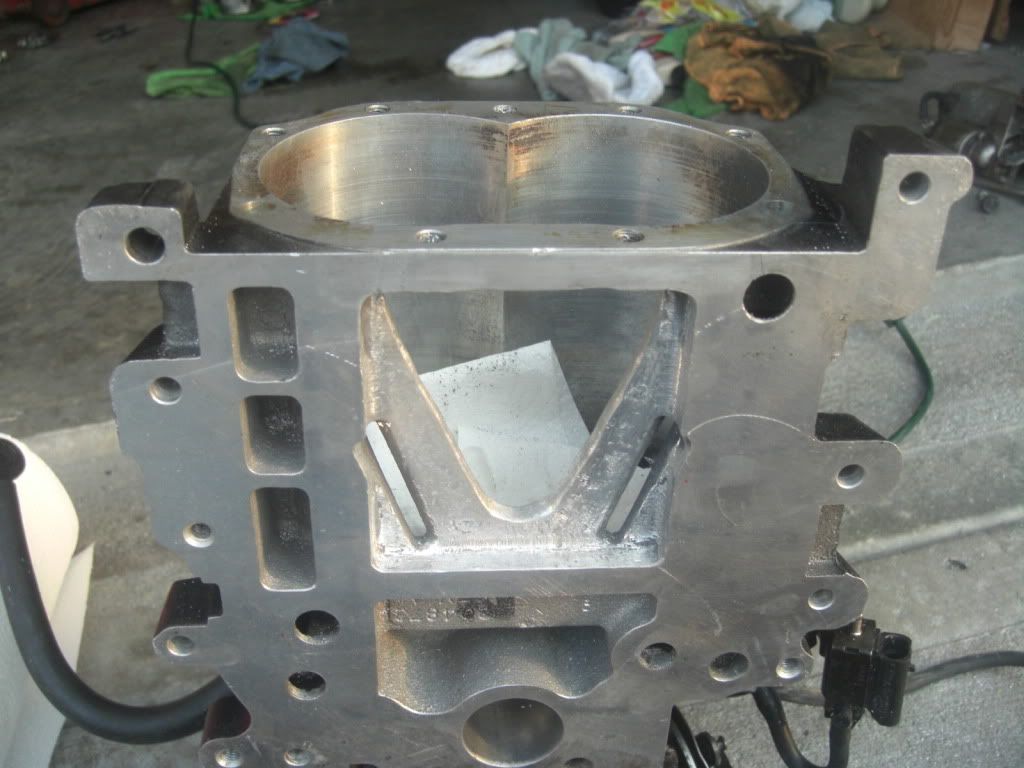
You will see a V on the underside of the blower. This is the outlet, and this is what you'll be porting. You want to make it bigger, and make the lower corners of it extend out. You'll notice what I'm talking about in the pictures. Grab your dremel, die grinder, ot what ever your going to be using, and take a deep breath. As for bits, i got 2 bits from Sears. They are Vermont American Rotary Files. I got one round one, and one cone shaped one the corners. Part numbers are 16672 for the round one, and 16678 for the cone. Power up your tool and get ready to grind.

Start by grinding the tabs out at the bast of the triangle. Like so:

Now, same thing for the other side. Once you have both tabs ground off, lets start opening up the triangle. Like so:

Again, likewise on the other side. Once its done, go around the entire thing again, and smooth up any dimples or rough edges that are left. My camera died before i was able to get any more pictures of the finished product. But, once your done porting what you wanted. take a blow gun and THOROUGHLY blow all the shaving out of the case. I also sprayed some brake cleaner on a shop towel, and wiped the inside of the case and the rotors as well. Next put the snout and rotors back into the case, and bolt it all together. Replace the gasket back on the lower intake, and put in the new yellow o rings that came with the gasket, and drop the blower back on your car, connect all fuel lines and injector connections, and replace the fuel pump fuse back into the fuse box. Get in your car and prime the fuel system by turning the key to the on position several times, finally, crank the car over and let it start. Check for any fuel leaks. If everythings good to go enjoy your ported blower") !
!
First remove your fuel rail. Pull your fuel pump fuse and start the car, this will relieve the fuel pressure. Next disconnect your fuel lines on top of the blower. Im top swapped, so i can release my disconnects with just my fingers. If you have a GTP, you may need special quick disconnects tools. Once the lines are disconnected, go ahead and pull the vacuum line off the fuel pressure regulator. Next, there are 5 10mm nuts that need to be removed from the fuel rail. One is on top of the blower, the other 4 are at each corner of the fuel rail. Unplug each injector, and pop the rail off.
Now to get the blower off. Lets get the belt off first, you'll need a 15mm socket, just pop the socket on the tensioner and pull the belt off. Now, there is a spark plug wire seperator by the snout, youll need to release that and move it out of the way. Now you're gonna need your 10mm here as well. There is a stud on the throttle body end of the blower, which will need a deep socket for. The bolt that goes through right by the snout, is a tad longer than the rest. Keep that in mind. The rest are all the same length. When your taking all of the bolts at, try to go in a criss cross pattern to keep from warping the blower case. Double check everything, and make sure you got all the bolts out. Sometimes its easy to miss one. Now take your intake off of the throttle body, whether is stock, or open cone, or a FWI, take it off the throttle body. Alright! Now to pull the blower off. Grab it by the snout and pull up, it should pop loose, at the reat, grab the tb and lift up to pop it loose. Chances are your going to need a new gasket at this point. Once the supercharger is free on both ends, go ahead and lift it out. You'll have to lift up about 2" then slide it towards the passenger side and out from under the wire loom. Go set the blower on your bench, and pick up the yellow o rings that are on the drivers side of the lower intake and throw them away. Grab a "beverage", you've gotten your blower off.
Now to disassemble the supercharger, dont worry. Its easy. Grab your 10mm again, and take off all the bolts along the snout. I was lucky, ant my snout and rotors all came out in one piece, so i didnt lose any oil. Take some paper towel, and stuff down into the blower where the needle bearings are to keep debris from getting in. Now flip your supercharger over and take a look at what your going to be porting.
You will see a V on the underside of the blower. This is the outlet, and this is what you'll be porting. You want to make it bigger, and make the lower corners of it extend out. You'll notice what I'm talking about in the pictures. Grab your dremel, die grinder, ot what ever your going to be using, and take a deep breath. As for bits, i got 2 bits from Sears. They are Vermont American Rotary Files. I got one round one, and one cone shaped one the corners. Part numbers are 16672 for the round one, and 16678 for the cone. Power up your tool and get ready to grind.
Start by grinding the tabs out at the bast of the triangle. Like so:
Now, same thing for the other side. Once you have both tabs ground off, lets start opening up the triangle. Like so:
Again, likewise on the other side. Once its done, go around the entire thing again, and smooth up any dimples or rough edges that are left. My camera died before i was able to get any more pictures of the finished product. But, once your done porting what you wanted. take a blow gun and THOROUGHLY blow all the shaving out of the case. I also sprayed some brake cleaner on a shop towel, and wiped the inside of the case and the rotors as well. Next put the snout and rotors back into the case, and bolt it all together. Replace the gasket back on the lower intake, and put in the new yellow o rings that came with the gasket, and drop the blower back on your car, connect all fuel lines and injector connections, and replace the fuel pump fuse back into the fuse box. Get in your car and prime the fuel system by turning the key to the on position several times, finally, crank the car over and let it start. Check for any fuel leaks. If everythings good to go enjoy your ported blower
!