• The site migration is complete! Hopefully everything transferred properly from the multiple decades old software we were using before. If you notice any issues please let me know, thanks! Also, I'm still working on things like chatbox, etc so hopefully those will be working in the next week or two.

New double roller installed

Im fine with you being angered over me not looking it up but I feel I get more info out of experiences from others than a youtube video that can br less informative on what needs to be done.

Not angry, and it's just that the information is really readily available on a double roller install, the benefits, the hazards. Bottom line is what LIFT are you planning to utilize on the build? If not high lift, you may not need it at all... You mentioned a cam, but nothing else. It's all relative...


In mot sure on the lift. I got the st5 cam going in with 150# springs. Machined heads from chris, ls7 lifters, I have the machined oil pump cover, then the chain. I believe thats all im not at home to tell exactly what I have.
 
Now I noticed the machining isn't as much as the stock one, but they both sit flush .....

the dbl roller gears (both jp and RM) have a poclet on the backside that sits over the crank shoulder. youd need Xray vision or some Prussian blue/dykem to see the chamfer to fillet contact points of an unmachined gear. the same pocket that sits over the crank shoulder is also the one that needs the excessive tool radius cutout with a 90* tool so it can fully seat against the 90* edge of the crank shoulder and allow the face to touch the crank while the shoulder top pocket and the chamfer to fillet clear just fine.

you could spend some time with a file to break the 90* edge of the crank shoulder if you didn't want to touch the pocket fillet while the chamfer is beign enlarged to 1/32nd past the tits of the keyway slots
 
Damn... I'm amazed how much info you have , and sad at the same time that I can only understand bits and pieces of it...

so even though it sits flush, it's not correct. It should slip slightly over the crank shoulder ?
Im pretty far along with the motor but it what I pictured isnt correct and will give me trouble , I'd be more than willing to remove it.
Thanks James
 
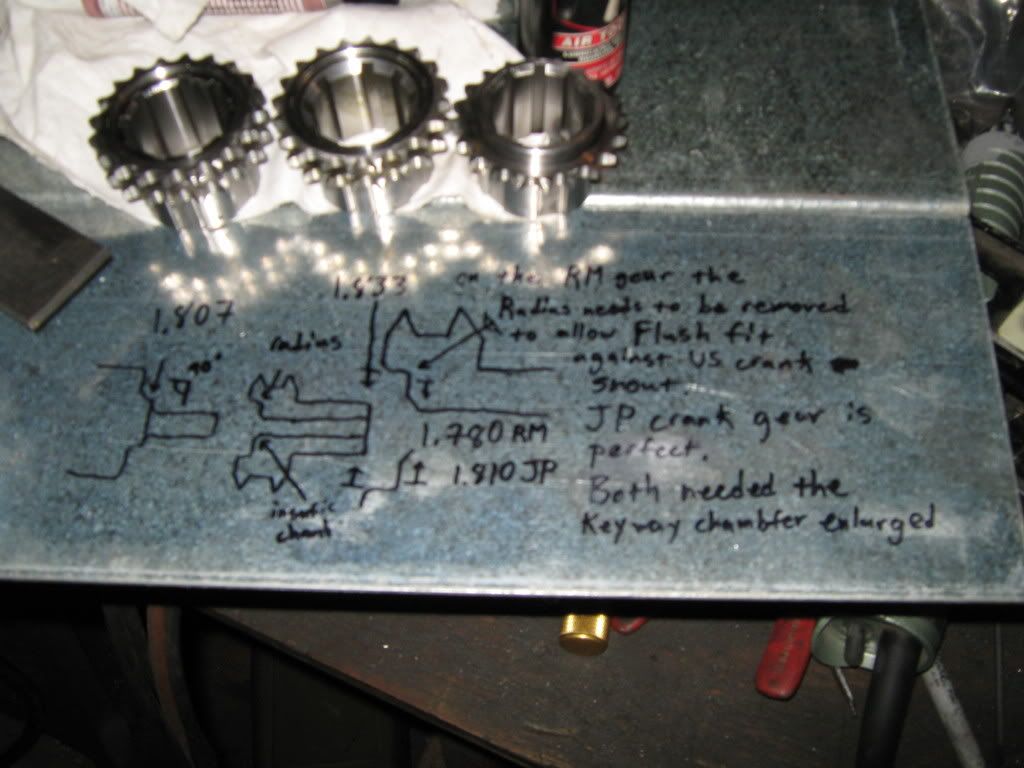
the flat face at the bottom of the crank gear recess (surface perpendicular to the crank centerline axis)must sit flush against the flat face of the crank (perpendicular to crank centerline)
between the snout fillet and the crank shoulder so that when the damper and bolt is installed and tightened all the flat faces of the assemblies are under direct contact and directing all loads straight into the strongest part of the crank...the shoulder face.

this also ensures that the stack height is the same as OEm so the damper and its belt grooves are where they are supposed to be.

unmodified the crank gear sits on the fillet, in which case the crank snout can flex as the flats aren't touching and its only touching at the smallest dia of the crank shoulder but because it doesn't sit flush and instead sticfks out ~0.015ish then it seems to mostly line up with the cam gear which is usually machined down at leas 0.020-030 when the crank gear is properly machined and sitting flush.
I have measurements in a pic in the Cgp thread that one of these days I hope gets copied here...lord knows I don't have the time to condense all my posts lol

make sure you spend your time on the ****ter with a needle file to remove all the burrs off the cam and crank sprocket teeth from the hobbing process. makes installing the gearset much easier along with the crocus clothing of the ID of the crank sprocket due to the deformation of the 9 keyways getting broached.

I love these damned ancient buick v6's too much...a lot of our issues are direct decendants of the early buicks issues just in slightly different forms lol

if you machine the chamfer to OEm and do not square off the tool nose radius of the pocket and open it up to the shoulder DIA and you install it your crank shoulders sharp edge will dig into the radius and youll still be a few tenths away from flush. though you can fix that with about 10-30 minutes with a file (to try to help keep you from flinging metal filings everywhere like a powered grinder would)

 
Last edited:
Back
Top