• The site migration is complete! Hopefully everything transferred properly from the multiple decades old software we were using before. If you notice any issues please let me know, thanks! Also, I'm still working on things like chatbox, etc so hopefully those will be working in the next week or two.

TOG Header owners, please step in...

Iron Indian

New member
Anyone have picture of there TOG headers installed? I specifically need pictures of the rear header/crossover joint area. I want to see which way you rotated the flanges. I was messing with this the other day and I didn't know which way would be best. I installed them one way, but i'm seriously thinking of pulling it apart, rotating the flanges again and doing it another way. Before I go through the trouble, i'd like to see what yours looks like.

Appreciate it guys...


Just for YOU, I got off my butt, went outside in the cold, to the cold garage, and took some pictures for you, uploaded them into my computer, resized, and uploaded them into my photo bucket account, again...just because its you. :D (trying to give you a guilt trip here...is it working? ;)

Here you go...
front flange:
tog1.jpg


Only thing you need to work around here is the coolant temp. sensor poking out of the LIM in that corner.

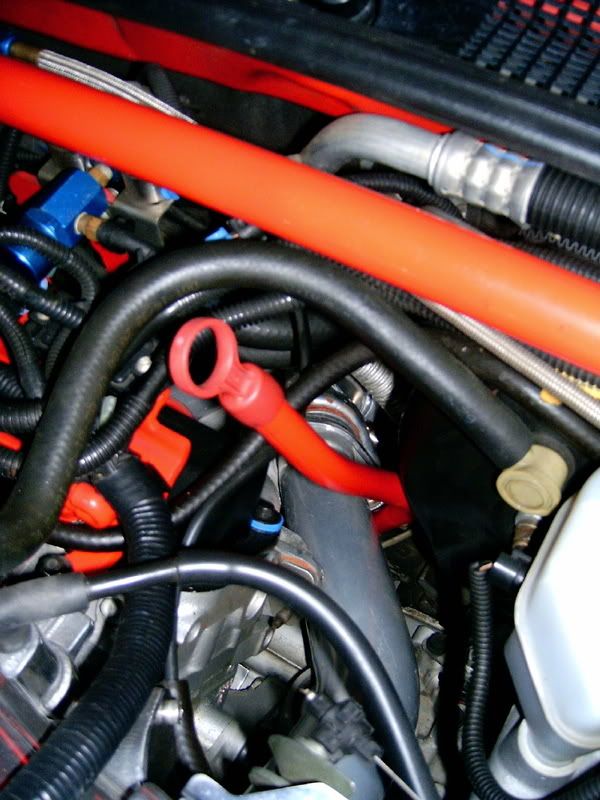
The rear flange...pick what ever shot you want:
Tog2.jpg

Tog3.jpg

Tog4.jpg

Tog5.jpg

Tog6.jpg


The only thing you have to work around here is the rear header where the cross over joins it, and the tranny dip stick tube. Both of those are in the way, but you can find a happy "center" between them to set the flange.

My suggestions:

1. Dry fit the set up.

Bolt the rear header up all the way, and set the front header in place, and start a few bolts to hold it up, and then set in the cross over and then adjust the flanges on how they set the best. Mark the flange to the cross over with a marker, just draw a line that way you can quickly see where it needs to go when your installing it for good.

2. the final set up.

Use COPPER RTV on the exhaust dough nuts. The first time i installed mine, I had no leaks, then I have removed them off and on countless times, and didnt want to redo it because of a leak, so from now on I have always used the copper RTV on the dough nuts just to prevent a leak.

Use Loc-Tite anti-seeze on all the bolts, and nuts on the set up. You will thank yourself later you did.

~F~
 
One thing that I thought was a great idea was what PRJ does. On the rear header crossover flange he installs a bolt and torques down a nut on each. This way all you have to mess with is tightening a nut down on each from the topside.
 
Loc tite is a brand, they also make anti seize.
Loctite® Heavy Duty Anti-Seize - Product - Henkel


Ok, fine...Go get you a bottle of Permatex brand Anti seize. :th_nanana::th_biggrin2:

The togs I have, are the orignal ones made by them, not the "revised" togs, and they have the attached nut on the flange, so yes, all you have to do is jack with a bolt and washers. Even still, the nuts can strip out, then you have to run a second nut, as I had to on the front flange.


~F~
 
Thanks for the pics Farns...

When I installed them I followed the sheet I got from TOG, which wasn't the best insturctions. It basically said install all pieces loose, tight both front and rear headers, then tighten the crossover. I did that. I've only ran the car for a minutes, I didn't feel a leak (couldn't hear because it was open headers). From the looks of things though the "donuts" don't seem to be down straight which I think is wierd, like they didn't seat right. They look crooked on both ends. I installed them on the neck like suppose to. I used a copper sealant on the donut gaskets (I've had friends have good luck with this stuff in the past), I installed the manifold gaskets dry though, I used the Felpro style ones not the stock metal layered versions.

I keep wondering if I should pull it apart, surely I didn't screw up anything. I thought about installing it like you said but I figured I better follow the instructions. I donno if I should leave it alone or start over.

BTW, I did my front and rear flange positioning just like yours and used antiseeze on everything so I did something right.


I think your fine. When I installed mine for the first time, the donuts do not sit well for me, as the flanges were a little "off" once again...dropping big bucks for a part, that doesn't have very good fit for the amount spent on it. Highway robbery I tell you! LOL After they have been on and off a few times...maybe 2-3 times total so far, they gaskets actually fit better IMO. Like the pipes will bend, and mold to the correct shape after use.

Their instructions suck for sure, as many do for after market parts, but its not rocket science to install them. I looked through them briefly, but didn't really go off them when I did the work.

With them being run for a while, I have never had to retighten my bolts. Either on the header to the head, or the cross over. I used new GM exhaust gaskets on my heads with no type of sealer on them as well, installed dry. I have never been a fan of Fel-Pro gaskets, and having to redo a job well done because of gasket failure on their part.

Never hurts to check the bolts later down the road. But if they are tight, and installed good, I don't foresee you having any problems down the road.

~F~
 
Thanks for the info. Yeah I was worried about screwing up the flange seal areas
(being tightened down an all). But if I remember correctly the donut gaskets are a softer metal than the pipe right?? So if I screwed up anything, I would of screwed up the donut gaskets only.

Now the only other thing i'm wondering, if I should bolt on the shorty DP to go to the exhaust shop (20 miles away). Either way i'll either have to tow it or drive it...
 
Back
Top