• The site migration is complete! Hopefully everything transferred properly from the multiple decades old software we were using before. If you notice any issues please let me know, thanks! Also, I'm still working on things like chatbox, etc so hopefully those will be working in the next week or two.

Connecting Rod Caps And Bearing Question - Urgent!

Status
Not open for further replies.

CNorell145

New member
I am in the process of rebuilding a 3800 series II engine, and it is not turning over freely after torquing down the connecting rod caps.

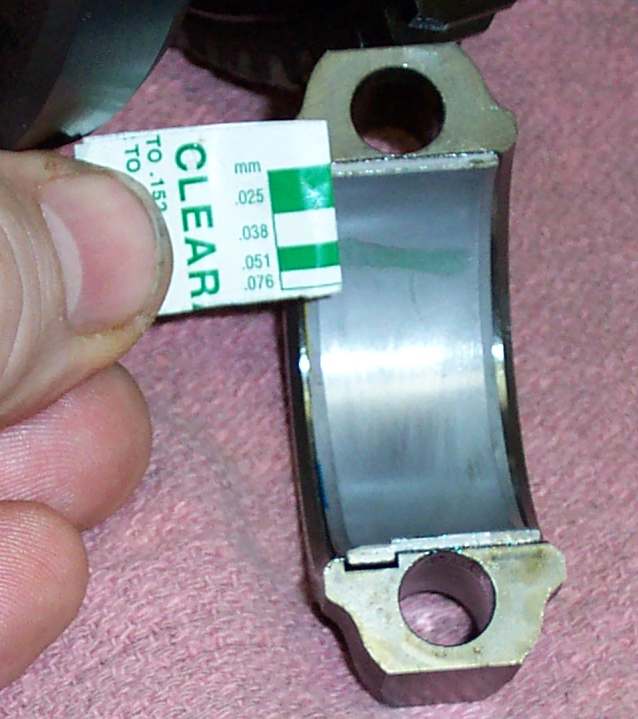
The issue here is that I am not sure which way the connecting rods and bearings went back on after I took them off. There is numbering on the caps themselves, do they face towards each other, away from each other, all towards the front of the engine, or towards the rear.... There are many combinations and I didn't take pictures beforehand, does anyone know?

Also, There are little notches on the bearings themselves... Should those be on the same side of the connecting rod as each other or on opposite sides?

All I have replaced is the crankshaft and bearings... Could something else be causing this issue?

Thanks in advance!


did you have the block line honed? if not thats a problem right there.

did you use plastigauge when torquing the caps? if not you have no idea if your with in spec or not.
 
What do you mean by block line honed?

And I did not use plastigauge, I looked up the torque specs and used a torque wrench. The specs I found said to torque the connecting rod cap bolts to 20 ft/lbs plus a 50* turn.
 
stop now.

your engine block need to go to a machine shop to have the mains align honed, these blocks can twist when you take the crank out.

all the caps should be plastigauge to see if they are in spec.


bushrod_plastigauge1.JPG


failing to do these steps to a 3800 block is called a 200 mile engine, if that sometimes.
 
I did not see that someone said that the engine had to be re honed.

As for rebuilding the engine, my father insists we do not need to buy a used engine, and while I would rather just purchase a good used engine, he would not allow it. So my hands are somewhat tied.


well call a few shops and get your quotes for for the work, when dad sees the est. a used engine will be a easy choice due to cost.

if dad wont listen and you continue your just wasting money at this point. save your gaskets for the used n/a block you'll end up with and top swap it with your heads all.

you really cant just slap new bearings in. ( its not a 350 v8)

the crank would need work too, the connecting rod journals of the crank would need to be cut and polished, over sized bearings used and so on. due to the blown rod you had. and the main caps being line honed they cut them too.
 
Did you keep the rods and caps together? If the align boring isn't happening then the first thing I'd do is remove the rods and take off the main bearing caps. Plastigauge the mains after torquing to spec and see if the crank turns freely. Make sure the clearances are within spec. All the clearances, not just one or two. The notches on the bearings go on top of each other, same side or whatever you choose call it. Hopefully the rods were marked 1 thru 6 and the caps were kept with the correct rod. If not you'll need to have an automotive machine shop check that for you and put them all back in the correct order, resize or whatever.

Install the rods in the correct position and one at a time check clearance with plastigauge and check for an easy rotation. If any rod causes a tightness problem stop right there and you'll have at least 2 rods and caps screwed up. There should be an arrow on the top of the piston and that points to the front of the engine. That will tell you about the bearing installation. Good luck.
 
-------------------------
- -

-------------------------

------------------------
-
-
------------------------
Those are the two orientations the bearing notches can be, as best as I can illustrate it with this text. Hopefully that gives a better idea... They are never "on top" of each other though.

In the top illustration, the notches should be on opposite ends of the connecting rod (signified by the long dashed lines), but they keep reverting next to each other in the illustration.
 
By the way, I am still trying to convince my father to just get a used motor as I type this.... A friend of my mother's that has been a mechanic for 30 something years stopped by, and said the same thing... That he would not rebuild any engine really, he would buy a good running used one. This is because there are so many things that could go wrong with the engine being starved for oil for even a little bit (I drove the car about a quarter mile to a half mile or so low on oil). Which is why I don't want to simply rebuild this - it may turn into a ticking time bomb.

My only question about getting a used engine is this: How would you check to see that the used engine is in proper working order?
 
That's OK, maybe I wasn't clear. They will both be on the same side of the rod. The notches will be kinda over each other just about a 1/2" apart. Notches go to notches. Don't put them opposite each other.

If you don't already know this I'm thinking you may want a machine shop to assemble this for you. Most of them don't charge all that much and it will save you from doing it two or three times. Or.....just use the plastigauge like I said above and check each one as you go.


Alright, that makes sense. I will probably end up picking up some plastigauge since it looks like my dad is dead set on continuing this project.

I will post any further developments here, as well as check periodically for any other advice/tips.

I appreciate the wisdom shared by all, and am trying to incorporate into the project to the best of my ability.
 
junk yards run the engine before its listed as good, and give a warranty.

you can take a battery and jumper cables with you and do a compression test before buying it if its from a you pick it type yard. you'll have to jump the starter with the cables to crank the engine.

check the oil so see if its milky looking, if so pass on that one. pull a valve cover to see how good or bad the oil is caked to the rocker arms and in the head. if its thick and built up with tar, pass on that one too.
 
I will probably end up picking up some plastigauge since it looks like my dad is dead set on continuing this project.

It's real cheap. Everyone carries it. Get the green and the red plastigauge. You'll more than likely need both.......although you shouldn't.
 
Even if your dad is against another motor, try and look at the positives. It's a great experience to get this deep into a motor. Learn all you can and you'll be more comfortable behind a wrench.


Yeah, I have already learned a lot.

Another question for you guys - I have heard it said that you are not supposed to touch the bearings with your bare fingers, as the oil on our skin can cause deterioration. I have also heard it said that even a little piece of lint caught in the bearings can cause damage. Do these claims have merit? Is it really that important to keep the bearings immaculate?
 
idk about finger prints, but yes install clean and dry and use the plastigauge, take the cap off check the chart, if its ok, you lube the bearing now with assembly lube and re torque it. off to the next one. repeat with every cap. its like building it twice, yes it sucks and takes time, but it should be done.

after the mains are all in it should spin rather easy and very smoothly. same goes for each rod main once its final and lubed and re torqued if it dont spin freely stop, theres a issue.

and you cant reuse the rod bolts. they are tty one time use, (same as the head bolts) so arp bolts and studs are nice cause they are re usable. and will withstand the plastigauge torquing and re torquing.
 
Just re-read this thread and have a question or two. It's apparent that you're somewhat inexperienced and that's OK. It's great to learn something new and you did well to ask the guys on this forum for some tips. You said that you replaced the crankshaft and bearings. Did you have the pistons and rods out of the engine? You didn't say. The reason I asked is that if you had them out and changed the rings and honed the block then it may well seem like it's locked up. The ring tension against a newly honed block will make it more difficult to rotate the crankshaft and to someone new that may be enough to make it seem to be locked up. Like Scottydoggs said above, plastigauge everything and yep, you'll be doing it twice but that's OK. I think it's great that your Dad and you are off on this adventure.
 
I did not take the pistons nor the rods out of the engine. We also did not have the block honed. Again, the old man says that "he has built tons of engines, and it isn't necessary - no one never worried about that back in the day" - same thing with the plastigauge, so we haven't plastigauged the clearances. He thinks it will be fine, I say do it to make sure.

He also said there should be no reason to replace any of the bolts... Does anyone have a specific reason not to reuse them that I can give him?
 
Status
Not open for further replies.
Back
Top