• The site migration is complete! Hopefully everything transferred properly from the multiple decades old software we were using before. If you notice any issues please let me know, thanks! Also, I'm still working on things like chatbox, etc so hopefully those will be working in the next week or two.

Adding a heated seat

PurpleGuy

New member
This weekend I decided to see if a heated seat would work in my car. The junkyard had a nice seat they said I could have for $25 I was eager to give this a try since i couldn't find a thread on here about it and i had no clue if it would work. My car is a 97, donor car is a 99. I'm not sure which years this will work on. Sorry no pics

Things needed:
Heated seat obviously (This one had power lumbar also)
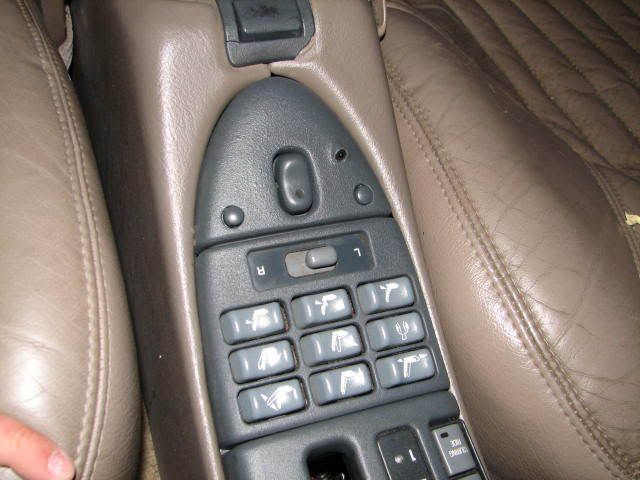
The switch and little cover plate
Console harness out of the car with the heated seat
A rather large torx bit (T50) and a 3/8 ratchet.

First thing to do is pop up the center console. The shifter will need to be in N or D. Take it completely off so you have more room. Make sure your parking brake is engaged so your car doesn't start rolling.

Pop off the connector on the left side of the conosle and then disconnect all the other connections. They include the 12v adapter, shifter light and a few others. Don't break the connector because you need them!

Next is to slide the seat far enough forward to get to the bolts that hold the seat in. There is one on each side of the track. Then disconnect the harness under the seat and rock it forward to get the "hooks" out of the floorpan and take the seat out making sure not to scratch up your center console or anything else.

After you've got everything of your donor car...or if you bought everything seperate do the same procedure to the car the seat is going into.

After your seat and console harness is out put the new one in and do everything in reverse order.

Finally enjoy your warm butt!!:th_laugh-lol2:

I would assume this would work with the passenger side seat if you can manage to find a passenger heated seat. You would need the harness out of that car also since the console harnesses are only wired for the options you have. EX if you don't have heated seats like me there won't be any wiring for them at all in the conosle..same applies for passenger heated seat..if the car didn't come with it then it wont have a connector in the console for it...but it more than likely is in the main harness like mine was.
 
Last edited:


Did you actually do this? If so, how did you hook up your wires to the fuse box? When the connectors aren't there, the fuse box isn't hooked up properly. As far as I know, heated seats have their own fuse.
 
Yes, I did this with my GP. It was very easy.

Yes, your right the heated seat does have its own fuse...it should be labeled "HSEAT/LUM" meaning heated seat/lumbar. If you have this fuse in your fuse block your car should have the wiring for your heated seat.

Look under your seat on the connector. There should be 2 orange, 2 black, a pink and a blue wire on the car harness...not the seat harness...theres a freakin ton of wires on the seat harness...at least on mine there is. Anyway if you have those wires i listed on the car harness you should be good to go.
Honestly I think every car is setup with the wiring in there because it's part of the main harness...the harness with the switch in it is a pigtail that comes off of the main harness.

Just check it out on your car, theres no way for me to know if its on your car lol.
 
Ive read about this quite abit accually. there was also a case were they used a driver side in a pass side since there is no heated pass seat. hard part is moving the controls over to the other side and that didnt seam hard
 
i did this in my OLD GTP, and before i sold it i kept my GTX interior and put it in my new GTP for a year now i have had no heat because its not working, i know in fact the seat works, and the switch, but when i put it in my new GTP and inserted the fuse i can select high or low but theres no heat in the seat, and leather is by far VERY cold in the winter.


i did this in my OLD GTP, and before i sold it i kept my GTX interior and put it in my new GTP for a year now i have had no heat because its not working, i know in fact the seat works, and the switch, but when i put it in my new GTP and inserted the fuse i can select high or low but theres no heat in the seat, and leather is by far VERY cold in the winter.

LOL thats why my GTP gets stored in the winter and my Blazer has cloth :)
 
Can any point me in the right direction to figuring out why my heated drivers seat isn't working properly. I was driving last winter, all of the sudden I knew something wasn't right. My azz was literally burning. I shut the switch from hi to the middle...off! Put it on low, no change burning me bad enough I had to keep my rear off the seat. Got out yanked the fuse and forgot about it until I saw this. It was crazy literally 130-140 degrees!
 
Damn.. Take that lol, I would think there is some sort of resistor that might of gone bad or a relay.
 
Ya I sure wish I knew what it was because it's cold as a mofo in Ohio, presently 12 degrees! I thought it was a bad switch but if that was the case it wouldn't get power at all. I just don't know what the heck the deal is!
 
What do you need to know.

Our heated seats are controlled via the switch. In the switch is two resistors one for high and one for low.

In the seat bottom is a thermister than tells the relay when to turn on and off. (I'd say this is your issue, maybe a wire came unhooked in the heater, like the typical issue where they don't work.)

The most common failure in our seats is the connection point where the wires going into the seat bottom connect to the heating element wire. The heating element wire is very thin and can be hurt easily. Reconnecting the wire is typically the free fix to having a heated seat again.


Keep in mind the below pictorial etc was on a 97 Bonneville. A year where heated seats weren't an option at all. And while it's a great seat..it's much more of a pain to pull apart than the GP or Regal seats. In my 2000 Regal the wiring was under the carpeting, taped to the main harness. Pulled it up, hooked up the switches and installed the harness on the seats and elements. Presto Regal was all set. It's easy enough to look at the schematics and know which parts you need. As long as you have a power seat or the connector for it, you can tap off that for a power source.


Seat heaters are from a Cadillac El Dorado. Not sure on the year. Probably Pre 95. I used a razor blade to slice the leather off the seats. Being careful not to cut the center of the seats. The heaters are sewn to the center pieces of leather that can extend to the outer edge of the seat if the piece of leather does. I found this at the shoulders and lower thighs. Then I did what it took to remove all the wiring that was attached to the seat heaters. This included a relay on each seat then following the wires that went into the center console to the switches. I took all the wiring and switches.

Step 1: Get seat heaters and switches by cutting leather and getting the switch pack. Here you can see them on the leather. The white is the heaters.
P1010121.jpg


Step 2: Test heaters to ensure they are work bothering to pull the heaters off the seats and being the process of installation.
P1010131.jpg


Step 3: Remove your seats from the car. Remove nuts bolting seat to floor and then the electrical and air connectors.
P1010143.jpg


Step 4: The front of the seat back has a channel sewn to the bottom of it and the back of the seat back has a arrow looking piece sewn into it and they are clipped together. I used my finger to get it started on coming apart and then gently pulled the whole thing apart. The there are other plastic clips (white) as seen here with the seat back held open.
P1010136.jpg


Step 5: Unhook side bolsters, they are clipped on the back they are the white side pieces in the above pic. This releases the bolster area. The I used two pair of needle nosed pliers to partially open the hog rings that hold the upper shoulder areas of the seat leather on. Here is a pic of one side with the rings still installed.
P1010141.jpg


Step 6: Using your hands under the leather, gently work it upward releasing the velcro that holds the leather to the cushion. Your seat back looks like this inside. The black is the velcro and the orange stuff is fluffy thread like stuff that is sewn to the leather and hooks to the velcro.
P1010137.jpg


I then took my heating element for the shoulder area and was able to insert it under the leather at the top of the seat and have it come to just above the piece of velcro that goes horizontally across, midway up the seat. It stuck tot he velcro nicely and I do not think it can move. I routed this wire down beside the vertical velcro and then behind the bolster into the back of the seat, then through a hole for the lumbar air lines. Then pull the cover down and slide your hand up under it to ensure the edges of the heater have not moved and are nice and flat.
Step 7: Inserted the lower seat back heating element and like the first piece it held onto the velcro well. Wires run through hole for air lines. Foot only needed for pic taking, not installation.
P1010138.jpg

IMG_2717.jpg


Step 8: Pull leather back around, clip bolsters and put hog rings back in the same places. Pushed front leather back under seat and clipped rear pieces onto bars. The pushed back lower piece under seat. The back piece is supposed to go under and loop back to clip into the front piece. I found that pushing the rear piece straight in it didn't clip properly but it did clip and I could not undo it. :D If it comes undone I will deal with getting it clipped properly.

Step 9: Seat bottom, basically there are white clips like the bolsters and bars that they clip onto. I pulled down and undid 1/2 of the seat. The other 1/2 was the back and one side that is pretty well under parts of the mechanism. Pushing down on the cushion the leather can be folded up over it. Again working the velcro loose with my hand. Slid the element in and routed the cord to into the lumbar air line hole. Left a piece of velcro for the leather to hold onto like the top. Then inserted the last element for the lower thighs. The wires are on the side but would show. I cut about half to a full inch into the cushion and inserted the wire in the newly cut groove that led down the side of the seat. Pulled the leather back over and checked via my hand again to ensure all element edges were smooth under the leather. Reclip bottom seat. I found this to be super easy.
IMG_2702.jpg


Step 10: Repeat element insertion on other seat.
P1010143.jpg


Step 11: With seats out, partially remove console in car to route wiring under carpet. Connect wiring per your diagram. Here is the console unbolted and laying on it's side.
P1010145.jpg


My diagram called for constant power to the seat relay and also ground. Here is my hookup at the power seat connector directly under each seat. Fused to 25amps.
P1010150.jpg


Step 11: Reinstall console and hang new wires out of it, because my new switches are not in yet. Therefore I am not permanently mounting the switches.
P1010149.jpg


Step 12: Reinstall seats.
P1010151.jpg


Step 13: Hook in switches and go for a test drive.
:D I can tell you they work fantastic. I like them already and will enjoy them this winter.
P1010152.jpg


Cut the panel and JB welded portions of the switch bezel in order to hold the switches into the panel.
P1010015.jpg

p1010023.jpg


Backside
p1010017.jpg


While waiting for that to setup to be sanded, I made the wiring harness to go to the switches.
p1010019.jpg


Quick test fit
p1010030.jpg


And the finished product
p1010032.jpg

p1010033.jpg


SEM makes the paints that match all car maker interiors so that you can repaint if needed etc. They also make a texture. A few test tries and you learn how close and how much to apply.

Add in adhesion promoter and you'll have great success
IMG_1006.jpg


Texture
IMG_1007.jpg


Somewhere i have a pic of these two plus the correct paint for a few different things. The paint though is graphite.

Now to go a bit off topic. Which do you want, homelink, fog light switch in duplicate or the original?
IMG_0993.jpg


Anyone recognize the fog light button? Once I put homelink where it originally was, I needed a different button.
IMG_1033.jpg


ABS defeat, EWP off switch, IC pump switch and PAC LED hole
IMG_3757.jpg
 
why is your bonne so awesomely equipped?

Which part?
Homelink
Retaining steering wheel control
Drag bags in the rear springs to keep traction
Onboard air pump (factory) to pump up tires when leaving the track
Window regulators that don't break
AL7 seats (18 way) with heat added (never had it factory)
Oil pressure gauge (factory)
Boost gauge (needle, not a bar)

Might have been because the motor had
S1X
1.8 Rockers
Stage 3 heads
Gen V
WBS stage 3 IC
Meziere EWP and 20gpm pump for IC
Flow detect kit
SLP's

Funny part is the fat car got 2.5" piping from the factory. With rear drum brakes ...ack.

FWIW, here's how I did a Regal.
http://www.bonnevillepro.com/forums/viewtopic.php?f=36&t=12038&start=0&hilit=planning+for+a+regal
 
Last edited:
Back
Top