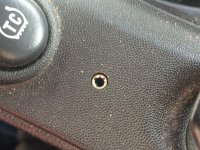
Hello everyone, after several months of owning my 06 Grand Prix GXP, I was frustrated that I had no way to play music from my phone through my stereo. I was determined to find a product that worked without buying a new head unit or one that costs lots of $$$. I was successful, and very pleased with the results. The product I purchased cost $85 and was from Ray Kawal (link below) who makes custom harnesses for the Corvette which shars the same NAV and XM receiver that we have in our cars. So to start, I emailed Ray who was extremely helpful, and soon had the answers as to if it would work on our cars. On is website, I chose the AUX 2 option because I wanted to mount the female port in my center console. So here is some pictures on my new AUX port.
Link: http://www.kawal.net/vettemods.htm
Link to AUX 2: http://www.kawal.net/auxinput.htm#Alternative 2
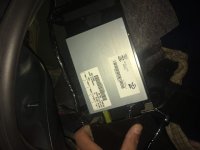
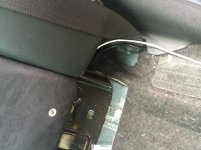
This is where I started. At the XM receiver in the back left hand side of the trunk by the taillight behind the side panel.

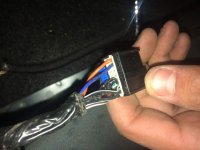
This is the cable you will be connecting the harness from Ray too. Its the only one so you can't miss it.

Then, after connecting it I made sure it all worked before I hid the wire in the car. All the harness does is bypass the XM antenna and then the receiver picks up from the phone. When and only when the phone is plugged into the end of the AUX cord. Once the phone is disconnected, The XM radio will begin to play again. (Great feature because you don't lose your XM radio) Sound quality is fantastic as well. All you have to do is plug in your phone and tap the XM1/XM2 button and you will hear your music playing.
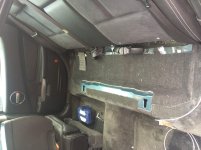
The next step was to hide the wire. I just ran it behind the fabric panel in the trunk wall to the back left corner of the truck where the rear seats fold down.
Seat Down:

Seat Up:

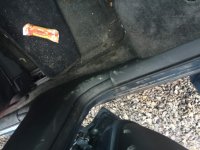
Next I removed the rear back seat. Very simple, under the face of the seat at the center of the right and left bench seat, reach far under/up and you will feel a T-shaped strap that you pull and it will release the seat. It was hard to pull and get my hands under the seat so don't be afraid to give it a good tug.

With the seat removed, I had to take off the 2 door/floor panels so I could life up the carpet to slide the cable under. I also had to remove the center console. That was very simple, there are 4 bolts at the bottom of the console. You will have to have to seats all the way forward to get the first 2, and then all the way back to get the next 2.

 I ran the cable underneath the padding on the bucket seat to avoid any chafing, then I lifted up the carpet as best I could and kept feeding the cable under the carpet by the left side of the center hump.
 More pictures to come soon.
Link: http://www.kawal.net/vettemods.htm
Link to AUX 2: http://www.kawal.net/auxinput.htm#Alternative 2
This is where I started. At the XM receiver in the back left hand side of the trunk by the taillight behind the side panel.
This is the cable you will be connecting the harness from Ray too. Its the only one so you can't miss it.
Then, after connecting it I made sure it all worked before I hid the wire in the car. All the harness does is bypass the XM antenna and then the receiver picks up from the phone. When and only when the phone is plugged into the end of the AUX cord. Once the phone is disconnected, The XM radio will begin to play again. (Great feature because you don't lose your XM radio) Sound quality is fantastic as well. All you have to do is plug in your phone and tap the XM1/XM2 button and you will hear your music playing.
The next step was to hide the wire. I just ran it behind the fabric panel in the trunk wall to the back left corner of the truck where the rear seats fold down.
Seat Down:
Seat Up:
Next I removed the rear back seat. Very simple, under the face of the seat at the center of the right and left bench seat, reach far under/up and you will feel a T-shaped strap that you pull and it will release the seat. It was hard to pull and get my hands under the seat so don't be afraid to give it a good tug.
With the seat removed, I had to take off the 2 door/floor panels so I could life up the carpet to slide the cable under. I also had to remove the center console. That was very simple, there are 4 bolts at the bottom of the console. You will have to have to seats all the way forward to get the first 2, and then all the way back to get the next 2.
Attachments
-
 picture001.jpg117.6 KB · Views: 36
 -
 IMG_1435.jpg185.1 KB · Views: 179
 -
 IMG_1437.jpg180.5 KB · Views: 177
 -
 IMG_1452.jpg192.9 KB · Views: 170
 -
 IMG_1451.jpg195.6 KB · Views: 171
 -
 IMG_1449.jpg182 KB · Views: 166
 -
 IMG_1450.jpg191.7 KB · Views: 170
 -
 IMG_1459.jpg182.9 KB · Views: 30
 -
 IMG_1459.jpg183.5 KB · Views: 165
 -
 IMG_1458.jpg184.9 KB · Views: 170