Thread: Painting the s/c

Page 1 of 2 12 LastLast
Results 1 to 20 of 35
  1. #1 Painting the s/c 
    GT Level Member wlmrt6's Avatar
    Join Date
    Mar 2010
    Location
    Sterling
    Posts
    177
    Thanks (Received)
    0
    Likes (Received)
    0
    Dislikes (Received)
    0
    I would really like to paint my supercharger but im not really sure what i need to pull of or what. Do i need to drain the oil or tape off anything besides the typical parts? i looked for a how to write up but i couldn't find one. Any advise? i know a lot of people on here have done this.
    Reply With Quote  
     

  2. #2 Re: Painting the s/c 
    DUI BABY Bio248's Avatar
    Join Date
    Jan 2008
    Location
    MILWAUKEE
    Posts
    31,340
    Thanks (Received)
    0
    Likes (Received)
    1
    Dislikes (Received)
    0
    if you want to paint the whole blower then just tape off the pulley and have at it.
    Reply With Quote  
     

  3. #3 Re: Painting the s/c 
    Perma-Banned! JK LOL Explicit_Spade's Avatar
    Join Date
    Dec 2007
    Location
    Omaha, NE
    Posts
    7,921
    Thanks (Received)
    0
    Likes (Received)
    0
    Dislikes (Received)
    0
    I would seperate the snout from the housing. Remove the BBV, and all sensors.
    Then mask the sc oil hole bolt, all openings (you do not want paint inside) and the entire pulley rod.
    Use a high temp engine paint for the best results.
    Quote Originally Posted by W-Body Store
    Remember, GM engineers didn't take into account your need for speed.
    Daily Driver: 06 Grand Prix GT / 9.4:1 CR / IS3 Heads / Ported Gen V / ZZP Headers / HPT Pro / Pulleys: 4.25, 3.8, 3.5, 3.4, 3.2, 3.0, 2.9, 2.7
    Projects: 86 Monte Carlo SS / 98 Sonoma / 74 Honda CB750
    Reply With Quote  
     

  4. #4 Re: Painting the s/c 
    GT Level Member wlmrt6's Avatar
    Join Date
    Mar 2010
    Location
    Sterling
    Posts
    177
    Thanks (Received)
    0
    Likes (Received)
    0
    Dislikes (Received)
    0
    what good does taking off the snout do? and do i need to drain the oil if i do that?
    Reply With Quote  
     

  5. #5 Re: Painting the s/c 
    DUI BABY Bio248's Avatar
    Join Date
    Jan 2008
    Location
    MILWAUKEE
    Posts
    31,340
    Thanks (Received)
    0
    Likes (Received)
    1
    Dislikes (Received)
    0
    its pretty impossible to get paint into anywhere when the blower is all sealed up as one piece.
    Reply With Quote  
     

  6. #6 Re: Painting the s/c 
    GT Level Member wlmrt6's Avatar
    Join Date
    Mar 2010
    Location
    Sterling
    Posts
    177
    Thanks (Received)
    0
    Likes (Received)
    0
    Dislikes (Received)
    0
    when it gets warmer ill prolly paint it and the front valve cover. maybe the dog bones
    Reply With Quote  
     

  7. #7 Re: Painting the s/c 
    GrandPrix Junkie machinegunsquid's Avatar
    Join Date
    Sep 2008
    Location
    Florida
    Posts
    3,759
    Thanks (Received)
    0
    Likes (Received)
    0
    Dislikes (Received)
    0
    I did mine in separate parts (snout, case, and rotor thingymahjig) but only because I just had the case ported, and it was all apart anyway.

    But with the whole blower together, you wont have any problems.

    Just clean the hell out of everything, and let it dry. Tape off anything you dont want painted, and use some high temp engine paint.

    I used Semi-gloss ceramic brake caliper paint I picked up at the auto-parts store for like $7 dollars, and some Semi-gloss High temp clear coat.

    Still looks good 2 years later.

    "**** bills. You can live in your car but you can't race your house" -dsmuts
    Want her to stop when she's not looking karate chop her in her crotch that should quiet her for a bit or at the very least put a smile on your face -REDCOMPG
    Reply With Quote  
     

  8. #8 Re: Painting the s/c 
    GT Level Member wlmrt6's Avatar
    Join Date
    Mar 2010
    Location
    Sterling
    Posts
    177
    Thanks (Received)
    0
    Likes (Received)
    0
    Dislikes (Received)
    0
    ok thanks i was looking at the duplicolor engine enamel. I want a darker grey with some shine to it. sortof match my car. see pics on profile if you want.
    Reply With Quote  
     

  9. #9 Re: Painting the s/c 
    GT Level Member wlmrt6's Avatar
    Join Date
    Mar 2010
    Location
    Sterling
    Posts
    177
    Thanks (Received)
    0
    Likes (Received)
    0
    Dislikes (Received)
    0
    Would i need a new gasket if i do this?
    Reply With Quote  
     

  10. #10 Re: Painting the s/c 
    GrandPrix Junkie machinegunsquid's Avatar
    Join Date
    Sep 2008
    Location
    Florida
    Posts
    3,759
    Thanks (Received)
    0
    Likes (Received)
    0
    Dislikes (Received)
    0
    Only if you take the supercharger off.

    In my opinion, you would be better off pulling the supercharger off, and removing the throttle body from the supercharger. All you need to do, is remove the fuel rails, and the supercharger bolts..all can be done with a 10mm socket.

    When I did mine, I also painted the throttle body. Just remove all the sensors, and tape off all the openings, and spray away.

    "**** bills. You can live in your car but you can't race your house" -dsmuts
    Want her to stop when she's not looking karate chop her in her crotch that should quiet her for a bit or at the very least put a smile on your face -REDCOMPG
    Reply With Quote  
     

  11. #11 Re: Painting the s/c 
    GXP Level Member JoRoW99's Avatar
    Join Date
    Jul 2009
    Location
    Grand Island, Nebraska
    Posts
    2,015
    Thanks (Received)
    0
    Likes (Received)
    0
    Dislikes (Received)
    0
    Ok ik this is an old thread, but what did you do about the stuff on the snout/fins ect. like the paint/coating. Can i just rough it up with sandpaper then paint over it? or does it need to all come off?
    '01 GT - Top swapped. ported SC/Heads/TB, SD headers, open cone, HPTuners, 3.4 MPS, 60#'s, E85.______________________SMGPFC #99_______________________
    Reply With Quote  
     

  12. #12 Re: Painting the s/c 
    GXP Level Member z3r0's Avatar
    Join Date
    May 2010
    Location
    Bunnell, FL
    Posts
    2,228
    Thanks (Received)
    0
    Likes (Received)
    0
    Dislikes (Received)
    0
    pics squid!!!

    Quote Originally Posted by TLSheff View Post
    I'm a Sex Offender
    Reply With Quote  
     

  13. #13 Re: Painting the s/c 
    GT Level Member Whitehispanic's Avatar
    Join Date
    Sep 2008
    Location
    Westborough
    Posts
    354
    Thanks (Received)
    0
    Likes (Received)
    0
    Dislikes (Received)
    0
    Any one have step by step of how to removethe supercharger? Or any pics ?
    *sig too tall*
    Reply With Quote  
     

  14. #14 Re: Painting the s/c 
    GXP Level Member z3r0's Avatar
    Join Date
    May 2010
    Location
    Bunnell, FL
    Posts
    2,228
    Thanks (Received)
    0
    Likes (Received)
    0
    Dislikes (Received)
    0
    Remove the spark plug wires.
    Remove the vacuum line from the fuel injector rail.
    Remove the fuel injector rail nuts and stud.
    Remove the fuel injector rail.
    Remove the booster bypass nut and hose.
    Remove the booster bypass.
    Remove the regulator valve and the harness bolt.
    Remove the boost solenoid bolts and hose.
    Remove the bolts from the vacuum block.
    Remove the engine wiring harness heat shield bolt and nut.
    Remove the engine wiring harness heat shield.
    Remove the MAP sensor bracket bolts and hose.
    Remove the MAP sensor bracket.
    Important: Note the location of the spacers and the bolt sizes to aid in installation.
    Remove the TBI nuts.
    Remove the TBI and gasket.
    Remove the bolts, spacers, and the stud from the supercharger.
    Remove the supercharger.
    Remove the supercharger gasket.

    GM Document ID: 193384
    http://sm.gpona.com:9001/si/home.do

    Quote Originally Posted by TLSheff View Post
    I'm a Sex Offender
    Reply With Quote  
     

  15. #15 Re: Painting the s/c 
    GXP Level Member JoRoW99's Avatar
    Join Date
    Jul 2009
    Location
    Grand Island, Nebraska
    Posts
    2,015
    Thanks (Received)
    0
    Likes (Received)
    0
    Dislikes (Received)
    0
    So I brought back a thread for nothing...
    '01 GT - Top swapped. ported SC/Heads/TB, SD headers, open cone, HPTuners, 3.4 MPS, 60#'s, E85.______________________SMGPFC #99_______________________
    Reply With Quote  
     

  16. #16 Re: Painting the s/c 
    GXP Level Member z3r0's Avatar
    Join Date
    May 2010
    Location
    Bunnell, FL
    Posts
    2,228
    Thanks (Received)
    0
    Likes (Received)
    0
    Dislikes (Received)
    0
    scuff it use self etching primer, sand that use color, sand color, sand clear, sand, clear, sand clear, buff

    working your way up in grit numbers

    Quote Originally Posted by TLSheff View Post
    I'm a Sex Offender
    Reply With Quote  
     

  17. #17 Re: Painting the s/c 
    GXP Level Member JoRoW99's Avatar
    Join Date
    Jul 2009
    Location
    Grand Island, Nebraska
    Posts
    2,015
    Thanks (Received)
    0
    Likes (Received)
    0
    Dislikes (Received)
    0
    Using wrinkle paint so 3 coats in a row and its done. Thanks for the first part though.
    '01 GT - Top swapped. ported SC/Heads/TB, SD headers, open cone, HPTuners, 3.4 MPS, 60#'s, E85.______________________SMGPFC #99_______________________
    Reply With Quote  
     

  18. #18 Re: Painting the s/c 
    GrandPrix Junkie machinegunsquid's Avatar
    Join Date
    Sep 2008
    Location
    Florida
    Posts
    3,759
    Thanks (Received)
    0
    Likes (Received)
    0
    Dislikes (Received)
    0
    I didnt scuff anything up, since its already a fairly rough surface to begin with.

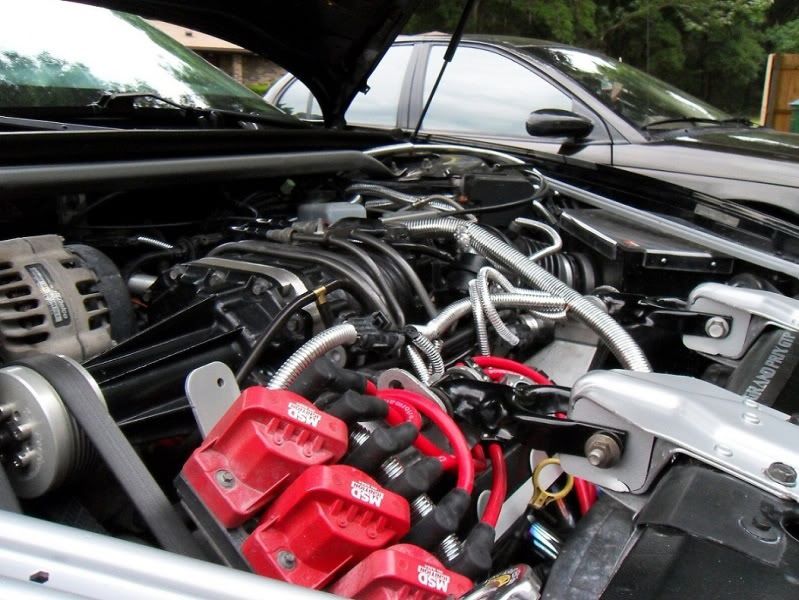
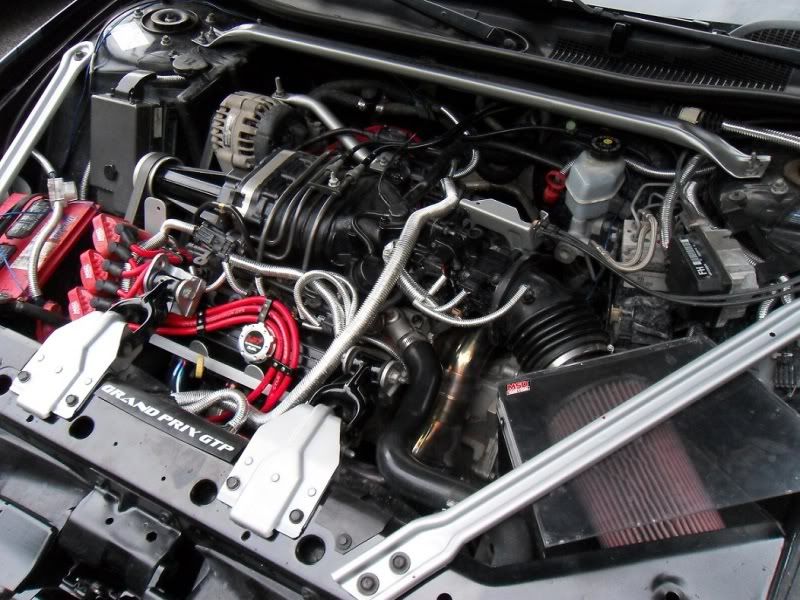
    And a few pics I have of it.


    Just make sure, anyone reading this thread, to clear coat the piss out of it, so it doesnt flake/peel down the road.

    "**** bills. You can live in your car but you can't race your house" -dsmuts
    Want her to stop when she's not looking karate chop her in her crotch that should quiet her for a bit or at the very least put a smile on your face -REDCOMPG
    Reply With Quote  
     

  19. #19 Re: Painting the s/c 
    GXP Level Member JoRoW99's Avatar
    Join Date
    Jul 2009
    Location
    Grand Island, Nebraska
    Posts
    2,015
    Thanks (Received)
    0
    Likes (Received)
    0
    Dislikes (Received)
    0
    That looks really good. I should have went with the silver/polished stripe on the rotor pack part but eh im too lazy.
    '01 GT - Top swapped. ported SC/Heads/TB, SD headers, open cone, HPTuners, 3.4 MPS, 60#'s, E85.______________________SMGPFC #99_______________________
    Reply With Quote  
     

  20. #20 Re: Painting the s/c 
    Sunroof S/C'es air 2 face E IN v Y's Avatar
    Join Date
    Jun 2011
    Location
    I’m a space bound rocketship and your hearts the moon.
    Posts
    2,103
    Thanks (Received)
    0
    Likes (Received)
    0
    Dislikes (Received)
    0
    They don't call me bump for nothing!
    How do look at GM Document ID: 193384?
    Reply With Quote  
     

Page 1 of 2 12 LastLast

Similar Threads

  1. Painting
    By Koniig in forum Visual/Body Modifications
    Replies: 3
    Last Post: 02-16-2011, 02:36 AM
  2. painting
    By macey43 in forum Visual/Body Modifications
    Replies: 5
    Last Post: 12-18-2010, 01:36 PM
  3. Painting help
    By Mad Monkey in forum Visual/Body Modifications
    Replies: 8
    Last Post: 04-13-2010, 07:21 AM
  4. Re-Painting my KYB AGX
    By Quicklynx in forum Visual/Body Modifications
    Replies: 2
    Last Post: 05-13-2009, 01:56 AM
  5. painting
    By datApocalypse in forum Visual/Body Modifications
    Replies: 0
    Last Post: 02-12-2008, 04:53 AM
Tags for this Thread

View Tag Cloud

Bookmarks
Bookmarks
Posting Permissions
  • You may not post new threads
  • You may not post replies
  • You may not post attachments
  • You may not edit your posts
  •