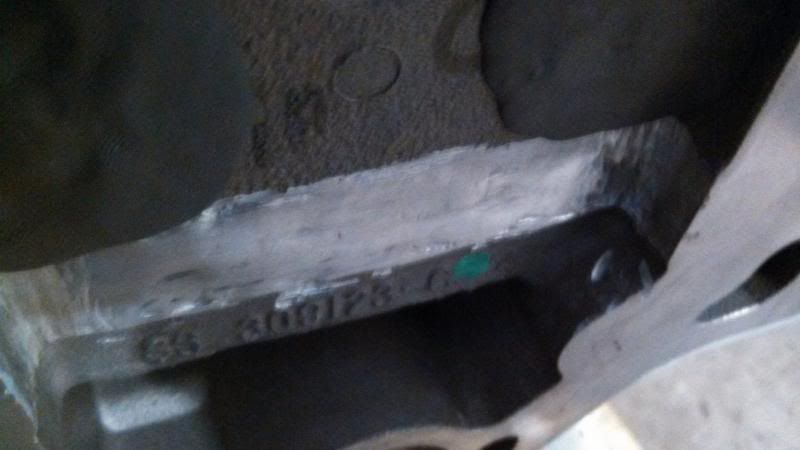
Thread: How to install your WBS Intercooler

Page 1 of 3 123 LastLast
Results 1 to 20 of 48
  1. #1 How to install your WBS Intercooler 
    GrandPrix Junkie machinegunsquid's Avatar
    Join Date
    Sep 2008
    Location
    Florida
    Posts
    3,759
    Thanks (Received)
    0
    Likes (Received)
    0
    Dislikes (Received)
    0
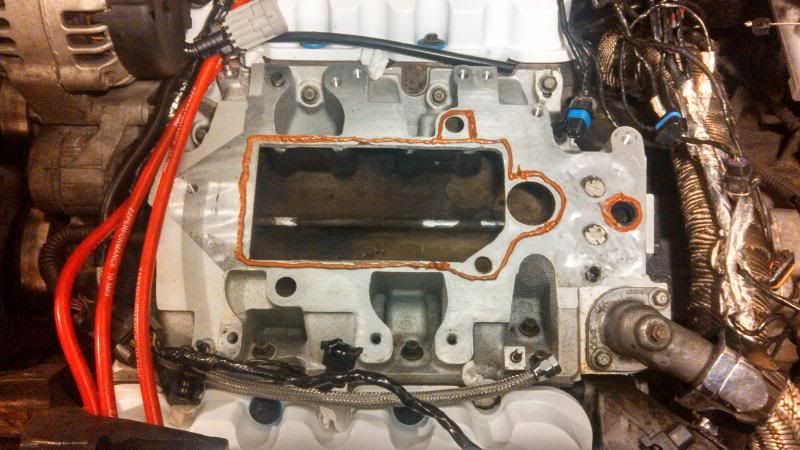
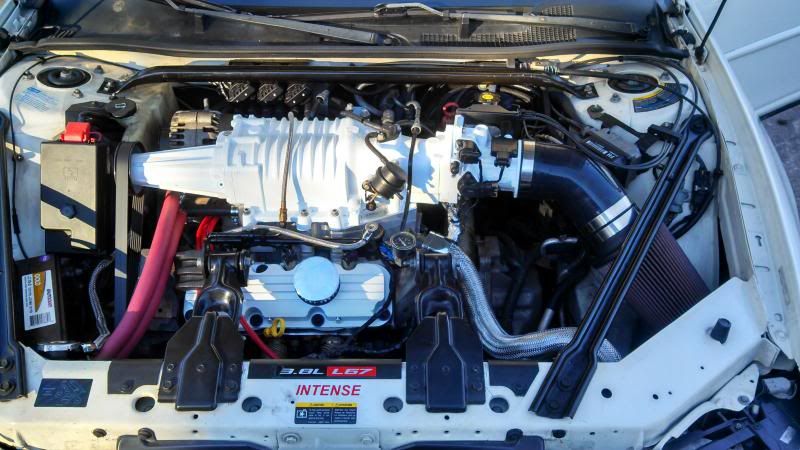
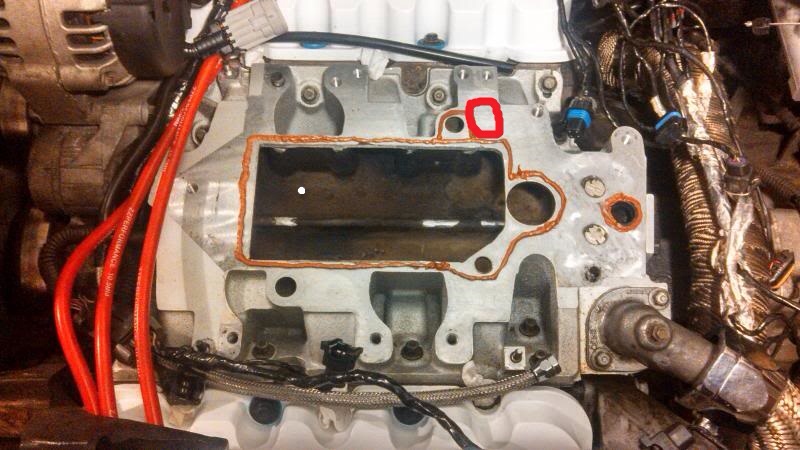
    Time to install your newly acquired intercooler!

    First and foremost use common sense and don't skimp out or use short cuts.

    Secondly, any modifications that took place I did as I deemed fit, you may decide to route your hoses a different way, not cut a piece that I did, etc. This write-up is to give a good insight on your own install. This was done on a 2002 GTP so your car may be different (GT's that are topswapped, 04+ etc)

    So lets hop to it shall we?

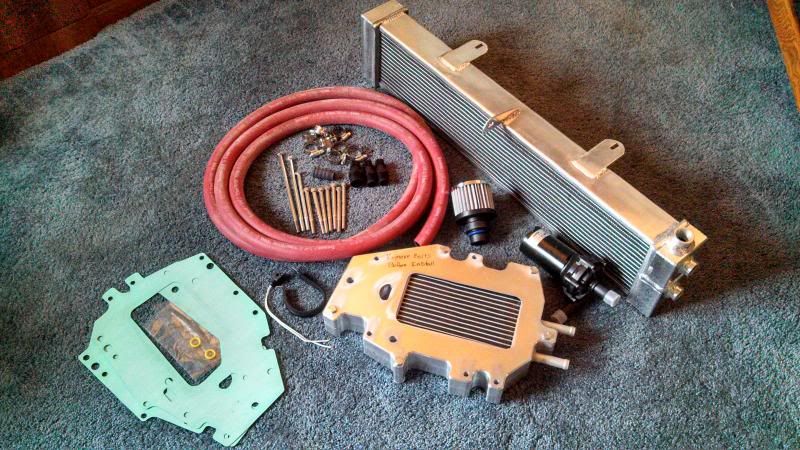
    Here is your Intercooler kit (the cores are known to be different, fret not they should all still install the same way)


    First things first, disconnect your battery.
    We're going to need to get the LIM out, so check out any write-ups or this video for more detailed steps.


    You will need to remove your intake from the throttlebody

    You will need to remove all the electrical connections on the top end of the motor to get the wiring harness out of the way.

    You will need to remove both the supercharger belt, and the accessory belt.
    *both are 15mm
    You will need to remove the vacuum lines from the fuel rail, LIM, and Map sensor.

    You will need to remove the fuel rail (Stock fuel rail cannot be used on a fullsize intercooler install unless it is modified) and have some sort of intercooler compatible fuel rail to install in place of the stock rails
    Be sure to bleed any pressure off before disconnecting the fuel rail, and have rags handy to catch the fuel that will spill out.
    *Some people will simply unbolt the fuel rail from the LIM and leave the fuel lines connected and pull it out of the way. I do not do this as there is the chance to damage an injector, or possibly crack/break the fuel lines*


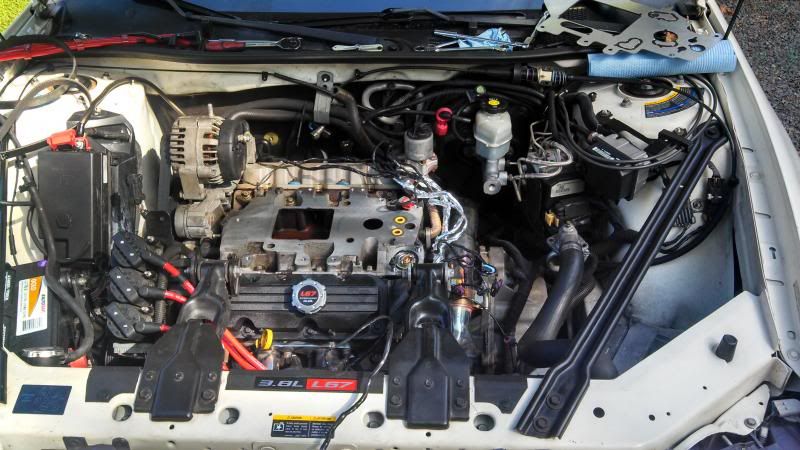
    *Fuel rail removed, most electrical connections disconnected, belts off*

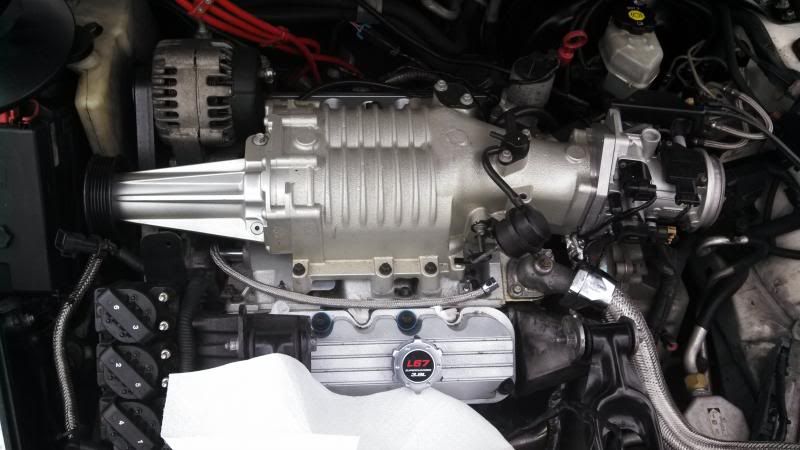
    Once you have everything clear of the supercharger, remove all of the bolts holding the supercharger to the LIM. None of the bolts will be reused.
    Make sure you have a good surface to set the supercharger on (a large piece of cardboard works great)
    Go ahead and lift the supercharger off of the LIM. There should be little resistance, if any is felt, ensure you have all the bolts removed.


    *disregard the changing colors of stuff, pics were taken at different times*

    Now that the supercharger is clear, you need to pull the LIM off (either to replace it with a ported LIM from a vendor, or so that we can port our own LIM) You will need to drain some coolant so that you dont get any into the lifter valley. I have personally found it the easiest to loosen the lower radiator hose from the water pump, and let it pour out there, this way you are not emptying the radiator and loosing more coolant.

    Once you have the coolant below the level of the LIM, we can go ahead and pull it. Either remove the hose from the T-stat housing, or unbolt the T-stat housing from the LIM and move the hose/housing out of the way.
    Remove the alternator

    Remove the alternator mount/accessory belt tensioner
    Remove the EGR from the LIM

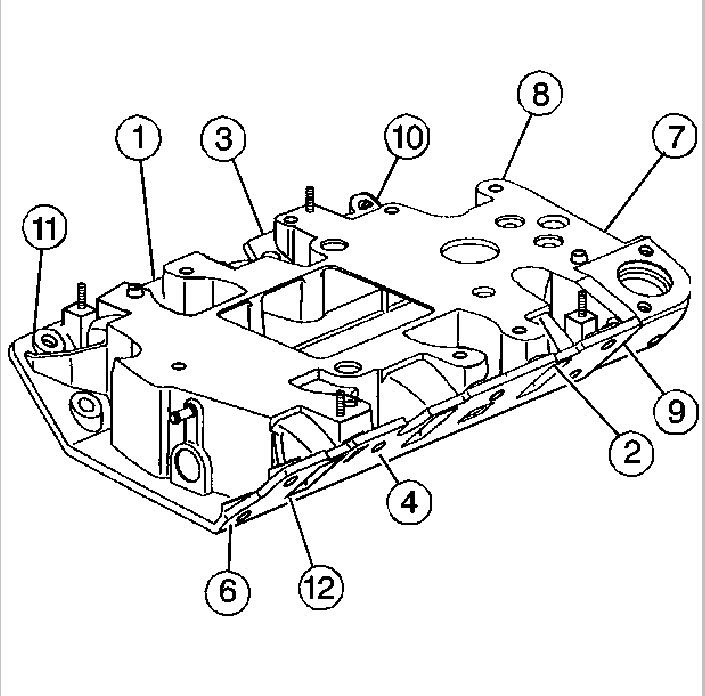
    Remove all the bolts for the LIM

    *not my image, using this as reference for the bolts that need to be removed*

    Remove the LIM keeping it as level as possible to reduce the amount of coolant spilled into the lifter valley.
    *You may need to tap the LIM up with a soft faced hammer, but usually a quick upward lift will suffice*

    Use something to cover the lifter valley so that you get no foreign materials in there. Paper-towels or a large rag work well.

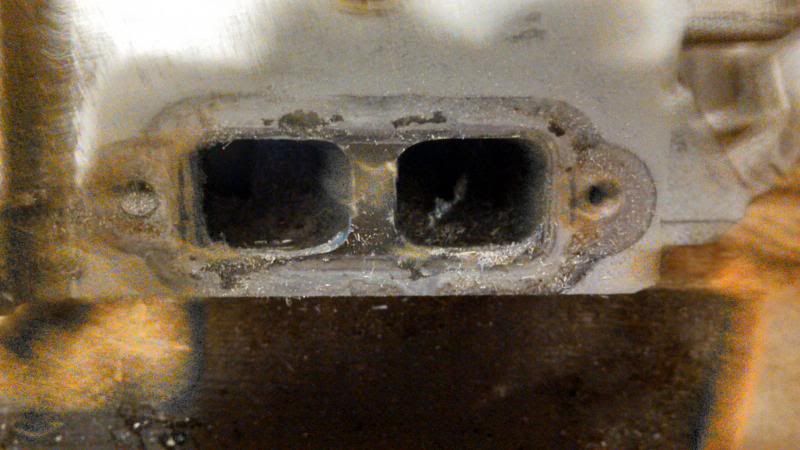
    Time to modify the LIM so that we get the most surface area for the intercooler core, and get better coolant flow between the back and front heads.

    Remove the 2 8mm bolts from the coolant end cap.
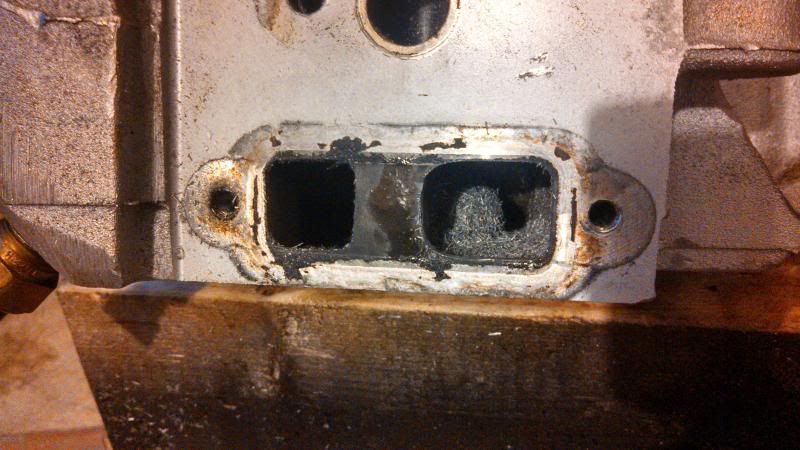
    Only port the insides of the coolant passage, not the outer edges.

    *Left side untouched, right side ported open.*


    *both sides opened up. *

    Block your coolant passages. I used JB weld and 2 dimes (has worked like a charm) thought some people only used Quiksteel, and other tap the LIM and use an insert to block them.

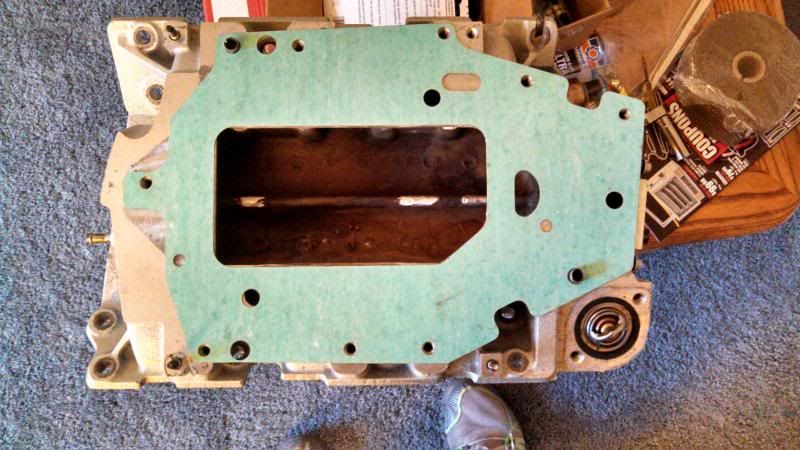
    Now lay the supplied gasket ontop of the LIM and use a marker to outline the inside edge of the intake area


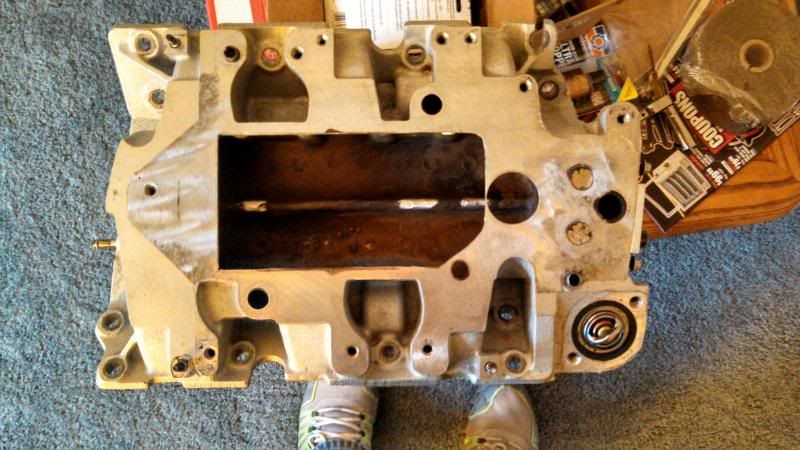
    Use your favorite means to cut the LIM open as showed. I used a dremel with 2 cutoff wheels, and a flapper wheel to smooth the edges.

    *Some people cut that sliver out between the BBV area and the intake area. I decided to leave it for a cleaner look and less sharp edges*

    Now clean the LIM free of all metal dust/shavings. I used high pressure water to get the majority out, followed by a copious amount of WD-40 to help lift any metal flakes. Rinse again and use 1-2 cans of brake-cleaner to get any last trace amounts of metal, oil, and water out.

    Time to move on to the supercharger.
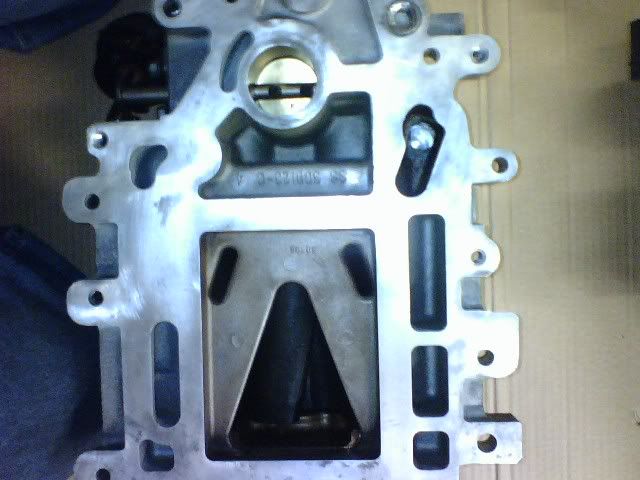
    *The removal of the H bar in the supercharger case is done to increase the surface area for the air leaving the supercharger into the LIM for better cooling purposes

    *Stock Gen V outlet, note the large "H-bar" separating the outlet area from the large "pocket" area*

    We need to grind that bar down. Using a lathe to mill the bar is the best answer, but for those true DIY guys, a Dremel will work.
    *I used a dremel, many cutoff wheels, carbide cutting bits, sanding bits, and a flapper wheel. This took about 3 hours all together (stopping every 5 minutes or so to let the Dremel cool down)
    Either tape everything off extremely well so no shaving can enter the supercharger in any way shape or form, or disassemble the supercharger.
    *If anyone is crazy enough to use a dremel, feel free to PM me with any questions about this process*

    This is what we want to end with.


    THIS IS OPTIONAL
    I decided to block the silencer ports to get added supercharger whine. DO THIS AT YOUR OWN RISK. Some people swear by it, some people think it's absolutely stupid.
    All I did was clean the silencer ports well with brake cleaner and a hard bristle brush. Follow the instructions on the Quiksteel (dont use JB Weld) and cover the ports. Within 10 minutes it will be rock hard.
    *You can see how much I used in the above picture of the H-bar delete*

    Time to reinstall!

    Remove the old LIM gaskets and clean the heads/block. Install your new metal LIM gaskets, using a glob of RTV at the 4 corners where the orange side gaskets meet the aluminum gaskets
    Set your LIM back on and start each bolt.
    Torque each bolt in sequence to 11ft lbs

    *Number 5 is located directly below number 11
    Another view


    *Some people only use the supplied gaskets, some only use RTV, some use a combination of the two. I perfer straight RTV*
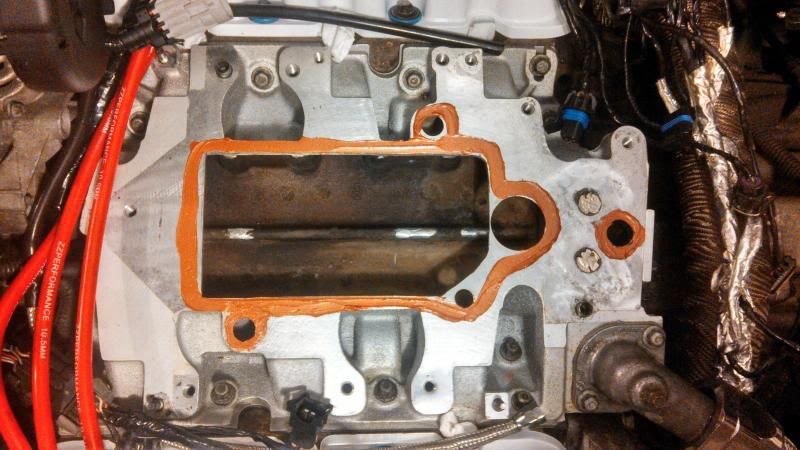
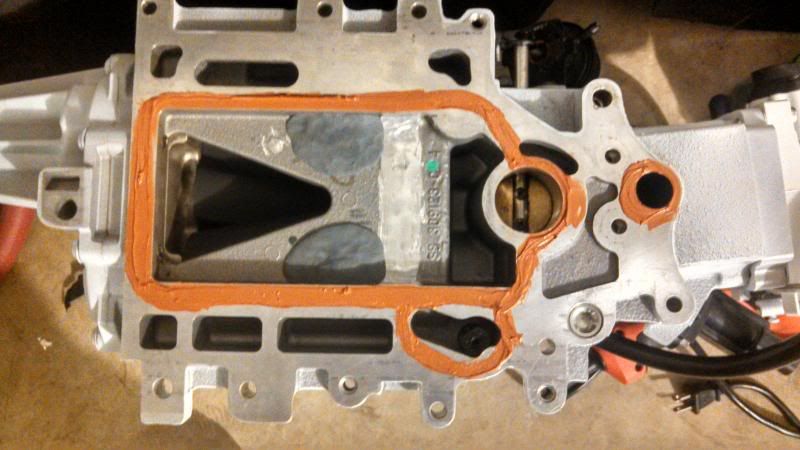
    Now it's time to get you Intercooler core on. I suggest that you put it on "dry" (as in no RTV) so you can see how it is going to fit. Once you are ready, go ahead an put some high temp RTV (I perfer the Ultra Copper by Permatex) along the edges of the LIM as seen in the picture.


    *I like to spread the RTV out slightly as shown so that you dont end up with part of it going inside the intake area*

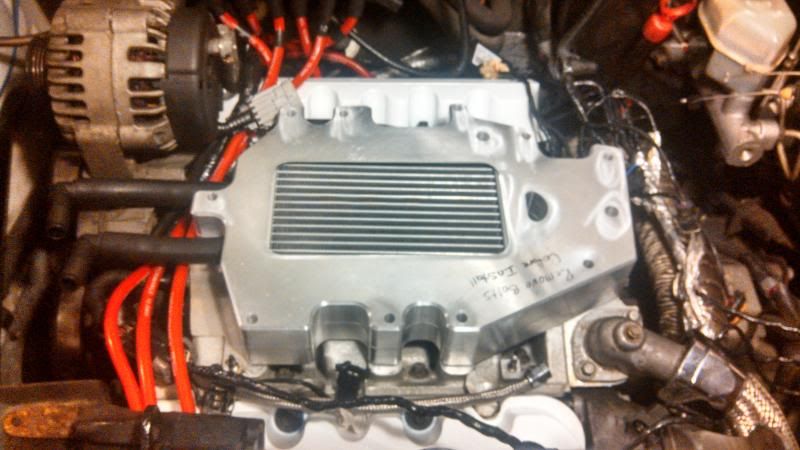
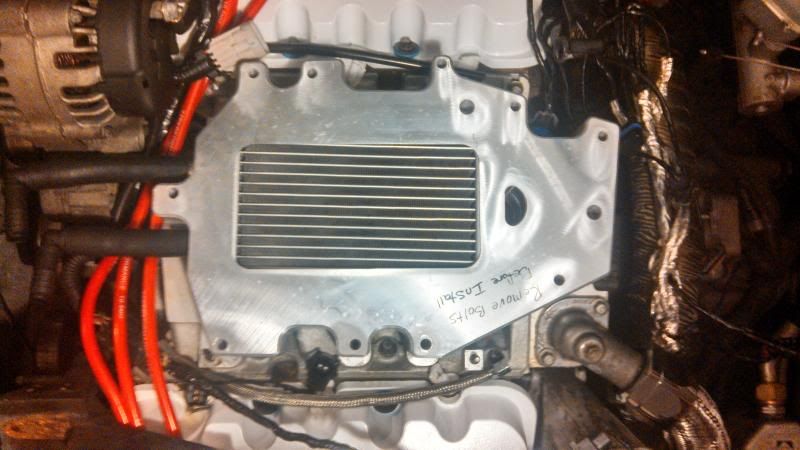
    Now set your intercooler core down on the LIM and make sure it is properly seated against the LIM


    Now we are going to RTV the supercharger to seal it to the IC core.


    *Follow this pattern. Yes the EGR is deleted and the front PCV is blocked, but to help ensure that the supercharger completely seals I put RTV around them*

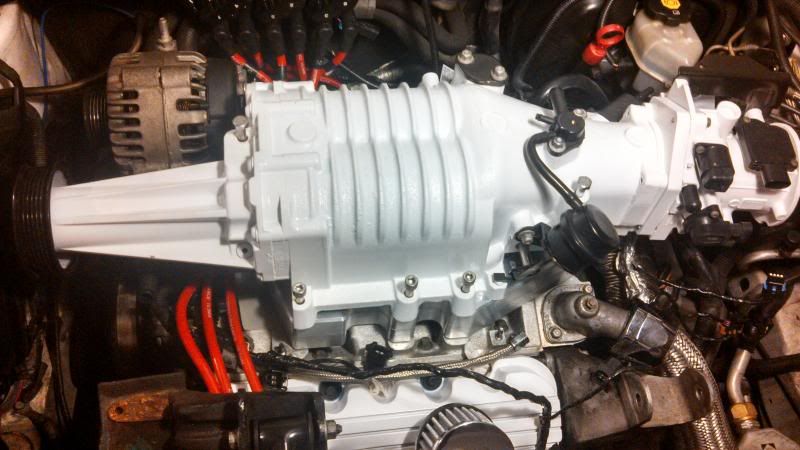
    Set your supercharger on the IC core and use a few of the new longer bolts to keep it lined up (it will want to slide around on you)


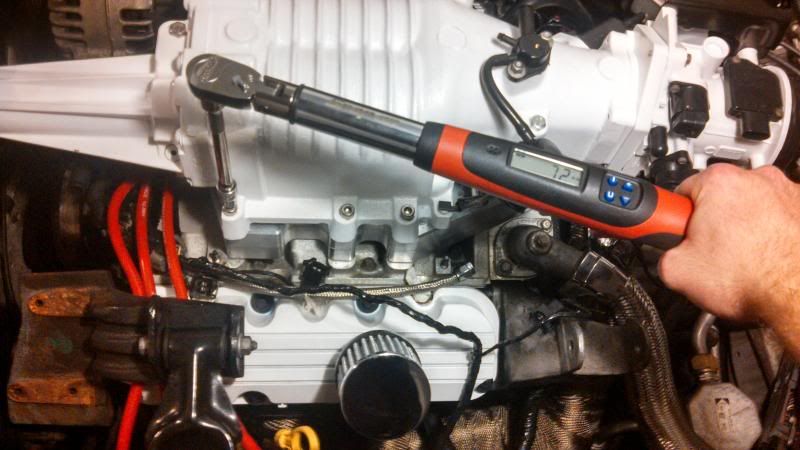
    Start all of the supercharger bolts. Torque them in to 17ft lbs.
    I've found that 1/2 torquing them in one pass, then full torquing them works best


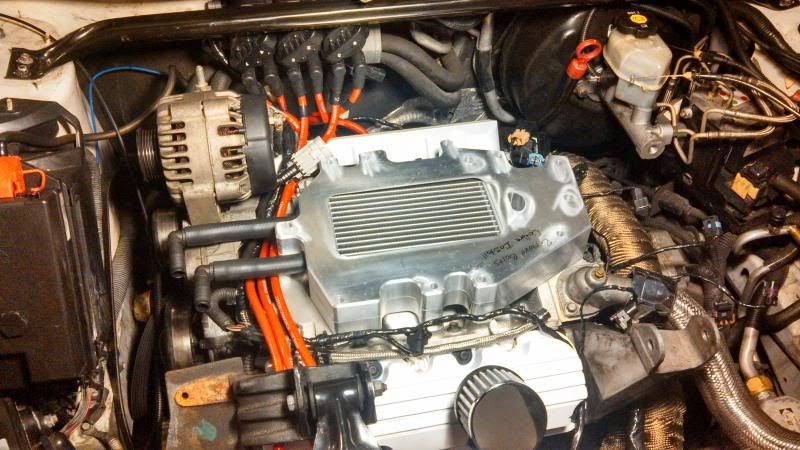
    Once you've torqued all the S/C bolts, spin the blower by hand. It should spin freely. If there is any resistance, loosen the bolts and retorque.

    Now install your new fuel rails (or fuel logs) and plug all the electrical connectors back in.

    Time for the Front Mount Heat Exchanger (FHME) installation!

    "**** bills. You can live in your car but you can't race your house" -dsmuts
    Want her to stop when she's not looking karate chop her in her crotch that should quiet her for a bit or at the very least put a smile on your face -REDCOMPG
    Reply With Quote  
     

  2. #2 Re: How to install your WBS Intercooler 
    GrandPrix Junkie machinegunsquid's Avatar
    Join Date
    Sep 2008
    Location
    Florida
    Posts
    3,759
    Thanks (Received)
    0
    Likes (Received)
    0
    Dislikes (Received)
    0
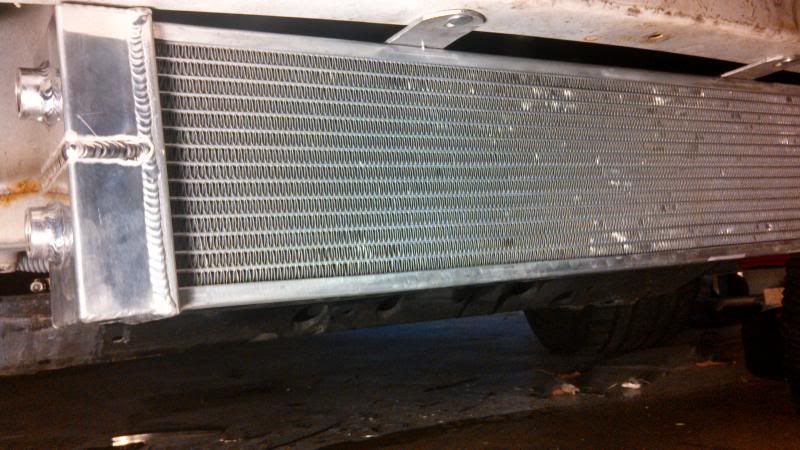
    Time to install your FMHE, IC pump, and your hoses.

    This write-up is based off of the current ZZP/WBS IC core that is shipped with all of their kits. If you have a frozenboost or other aftermarket style install will be similar, but you may need to cut more stuff or route your hoses differently.

    All steps below are assuming that you are using the Bosch pump and you are routing your hoses as I did mine
    *If you are routing your hoses differently make sure they don't contact the belt or become kinked anywhere/can rub against a metal edge

    First step is to remove the front bumper cover.
    Pull every push pin/clip in the center latch area along with the 6 10mm bolts holding the plastic tray to the frame and the headlight brackets.
    Remove the plastic tray and air diverters.
    Remove the 10mm bolt in each wheel well that holds the bumper to the fenders. You will feel a small recessed area in the fenders edge, this is where the 10mm bolt is.
    Unplug your fog lights (unhook your HIDS if applicable)
    Remove your driver side headlight (removing the passenger side isn't necessary, but it does free up a little room)
    Remove the splash guard thingy from under the car. It is held in with 3 10mm bolts. (it's a little stubborn to remove, but it will come out)

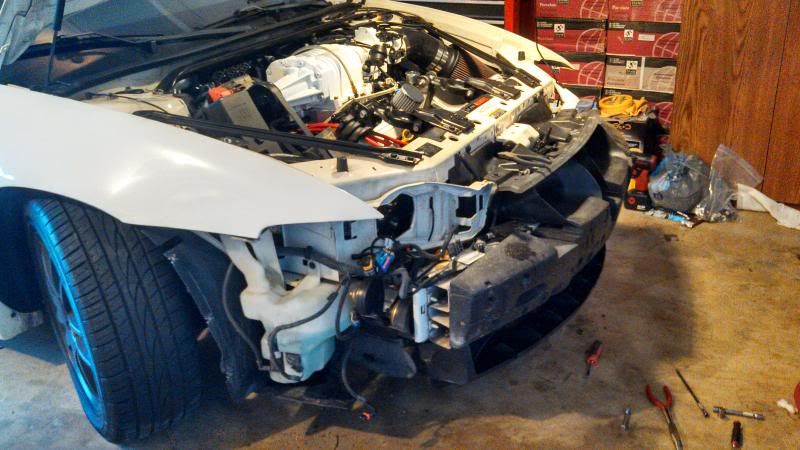
    Now remove your bumper cover. Should leave you with a mess like this.

    *I left all the center stuff in, but it would have been easier to remove them first*

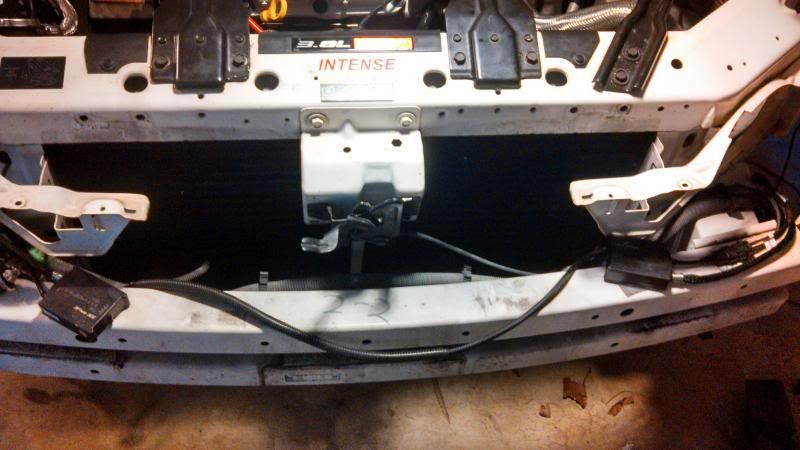
    Center area should look like this.

    The long loomed wire draped over the front is for my HIDS so don't freak out that you dont have this.

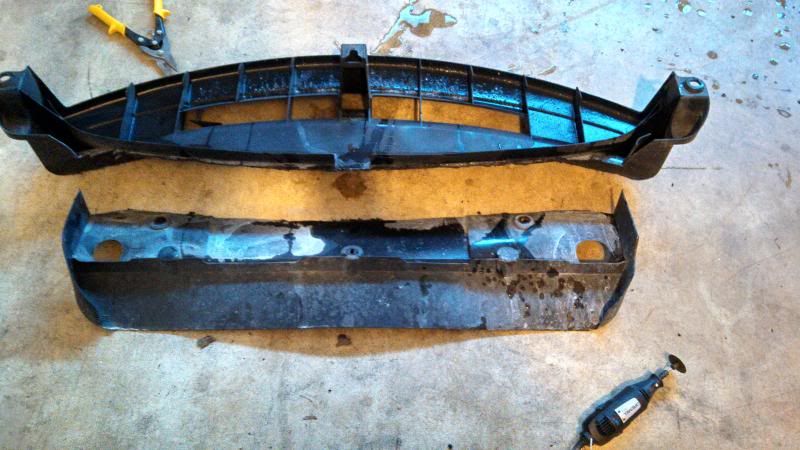
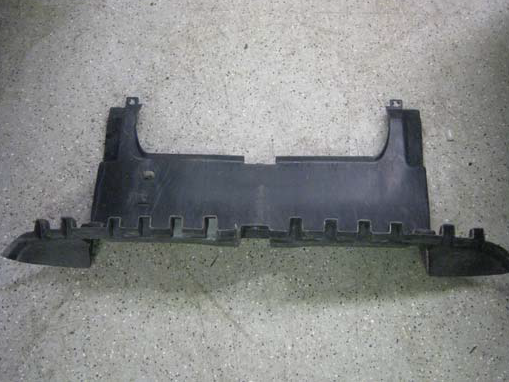
    We need to modify the following spash tray thingymabob as such


    This piece does NOT get reused


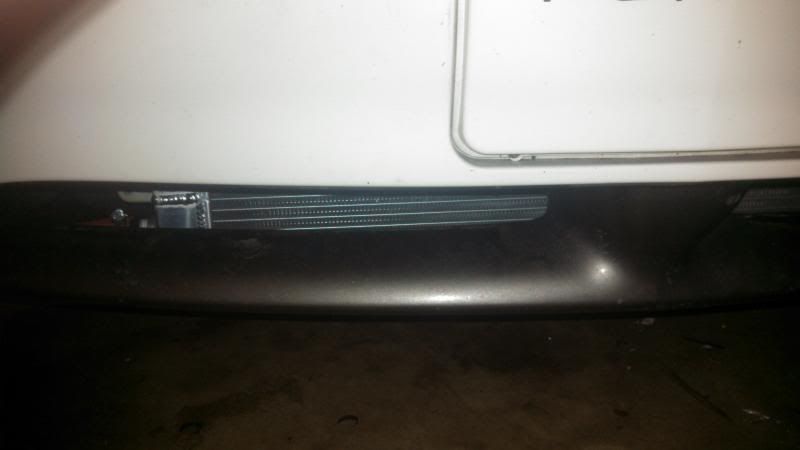
    Now to mount the FMHE

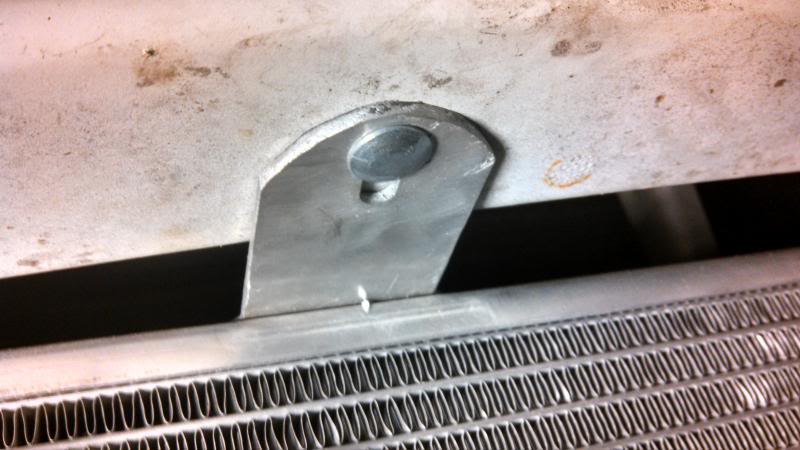
    If you look under the curved section of bumper there are a bunch of holes. we are going to utilize 2 of them (2nd farthest out I believe, but the tabs will align perfectly if you hold the FMHE centered)


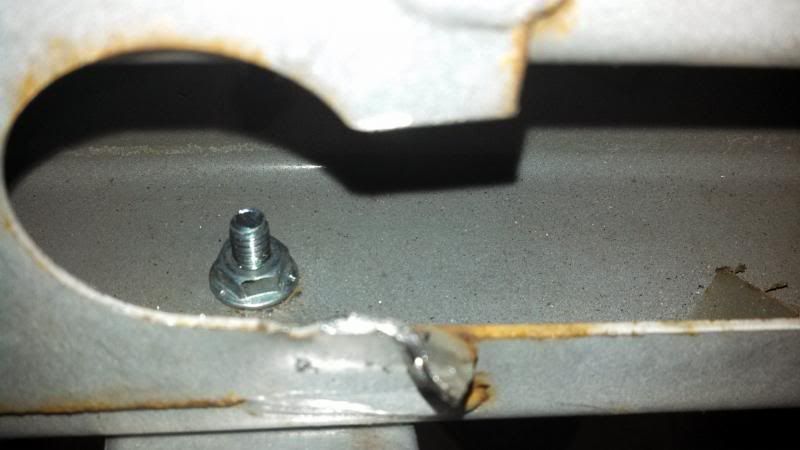
    I used 2 small carriage bolts, but you can use whatever tickles your fancy. They worked perfectly for me, but no reason a standard bolt/washer wont.


    (there are large holes stamped out of the bumper bracing that give you juuuustttt enough room to get a 1/4 drive flex ratchet in there, but I got really upset so i cut between the outer most lower and the one next to it as seen in the above picture to get a little more swing on each nut)

    Above shot

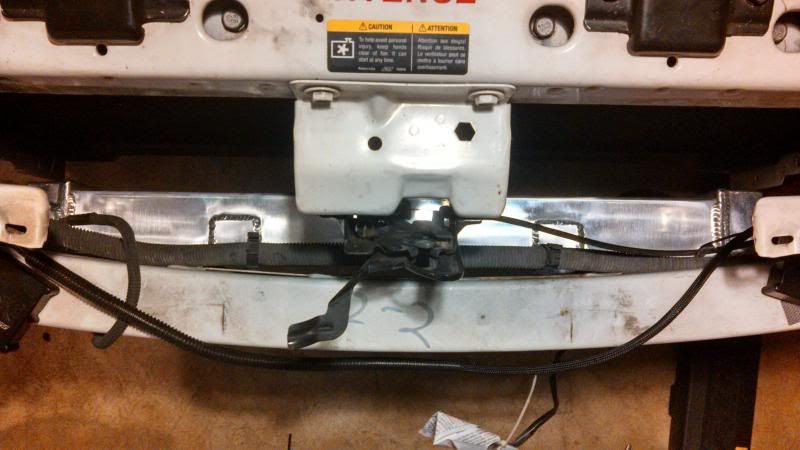
    (the large center mounting will either need to be bent out of the way, or you can do as I did and drill a hole in the center hood latch support, and zip tie that thing like a true car modder)

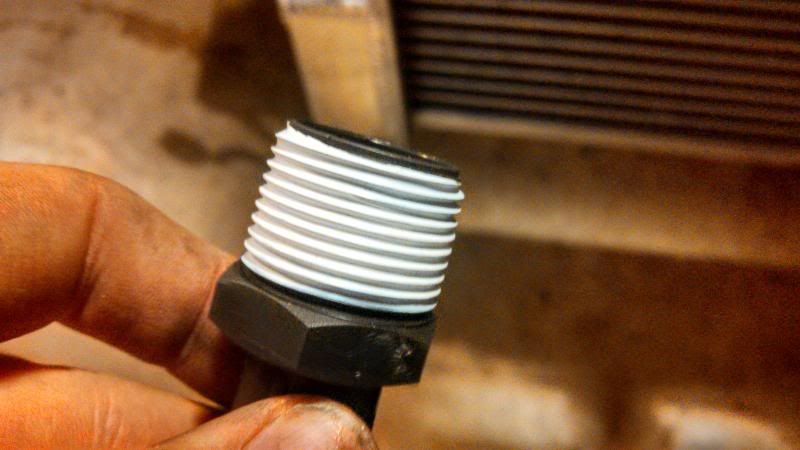
    Install your fittings into the FMHE. I personally used teflon tape to ensure a perfect seal


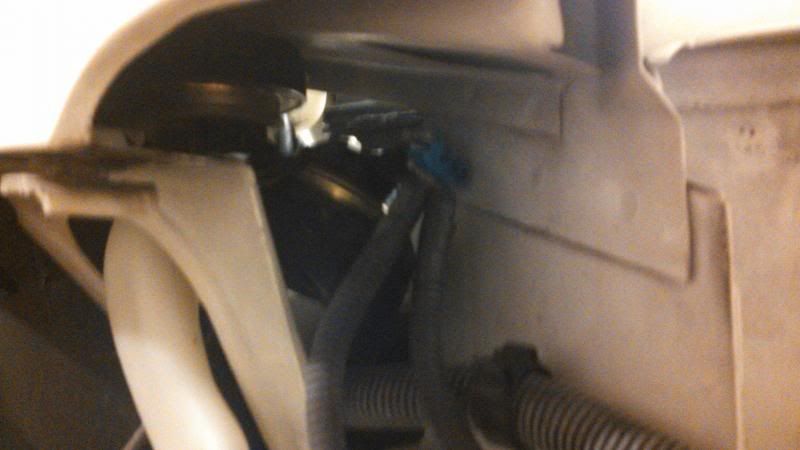
    I relocated the horn to mount my pump. I had to extend my foglight harness to do this.

    Horns stuffed into the fender. They fit snug, sound the exact same and are the same loudness.


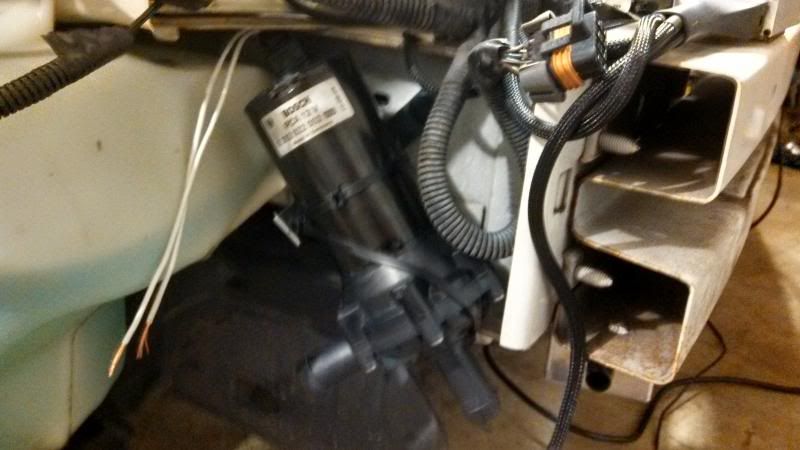
    I used a standard 4" by 4" 90* bracket to mount my IC pump along with 6 zipties. (mightycarmods style)


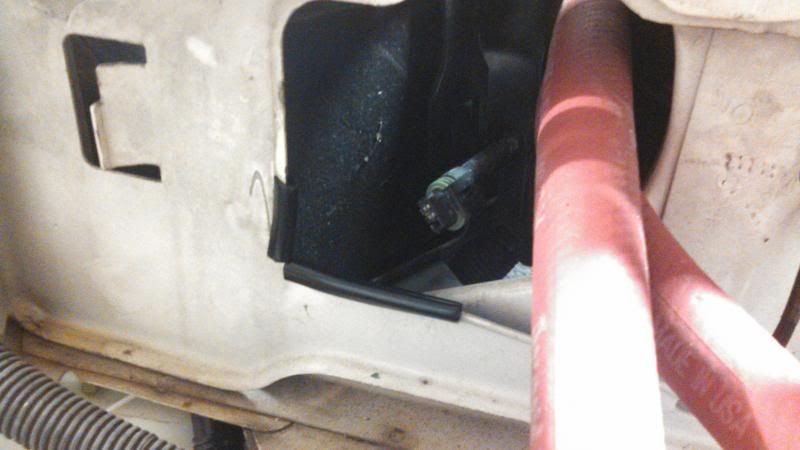
    To get a little more clearance for the hoses I cut a small section out of the headlight bracket and put some trim around the cut edges to protect the IC hoses.


    Sorry for the lack of pics from this point on, but the temp got down to below freezing in the garage and I was pretty upset, so I just wanted it done. If you have any questions about routing, cutting, or anything, PM me.

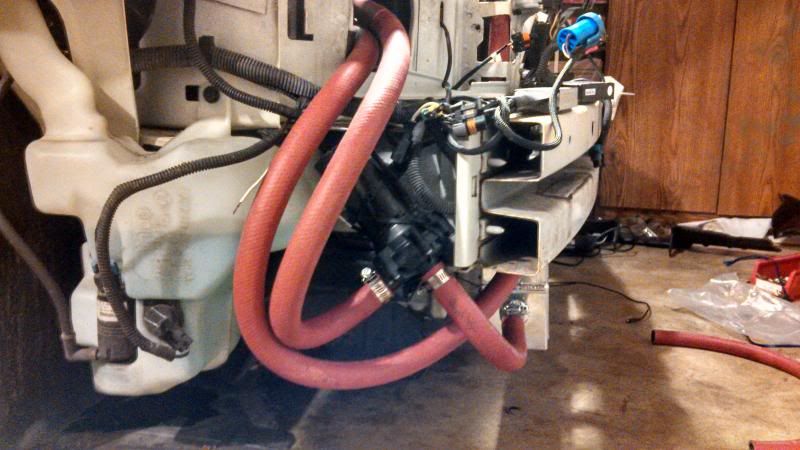
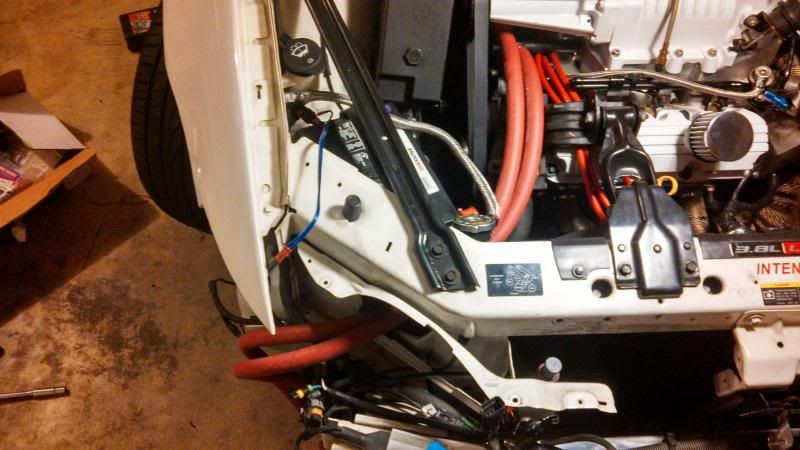
    Hoses installed.

    Routing goes as follows:

    Bottom of FMHE to Pump inlet
    Pump outlet to IC Core (doesnt matter which fitting)
    IC Core to top FMHE fitting

    *Thought behind this setup is that the bottom of the FMHE will always have fluid so the pump can't suck in air and burn itself up, and that the pump will be getting the COOLED fluid, as opposed to the hot fluid straight from the core, which should prolong the pump's life*


    How I decided to mount my fill tube. It has since been replaced with a clear high temp hose so I can view coolant levels.

    Just drill 2 small holes and use 1 ziptie to hold it secure, but not too tight or the cap wont fit


    All plumped up

    Now to the IC core side

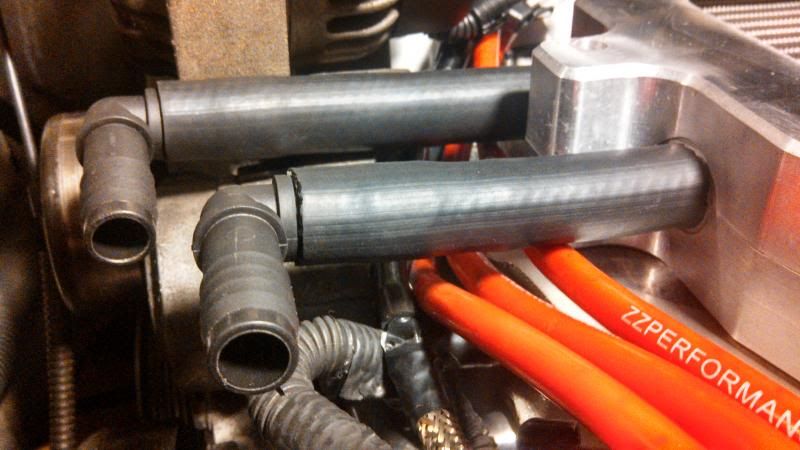
    You can see the 5/8 heater hose (black hose) used to connect the core to the 90* 5/8's fittings.


    You can see about how long they are cut to


    Wire the pump up. Find a good ground source and ground it out, and a switched 12v source for the pump/relay.
    I ran an 'add a fuse' off my fuel pump fuse in the underhood panel.

    Pin 85 is your ground
    Pin 86 is from the 'add a fuse' (switch source)
    Pin 87 is from your battery (power wire)
    Pin 30 is to the Relay (positive)

    Then you ground the other pump wire


    Ensure it turns on and prime the system. (start adding coolant) Let it run for a few minutes and keep adding coolant/distilled water (or premix) until it starts to come up the fill tube, let it run until it quits taking more fluid.

    Reinstall the front bumper cover, and all the center latch area parts (tray, air diverters and stuff)
    Don't forget the 10mm bolts in the fender. Yes they are a PITA.

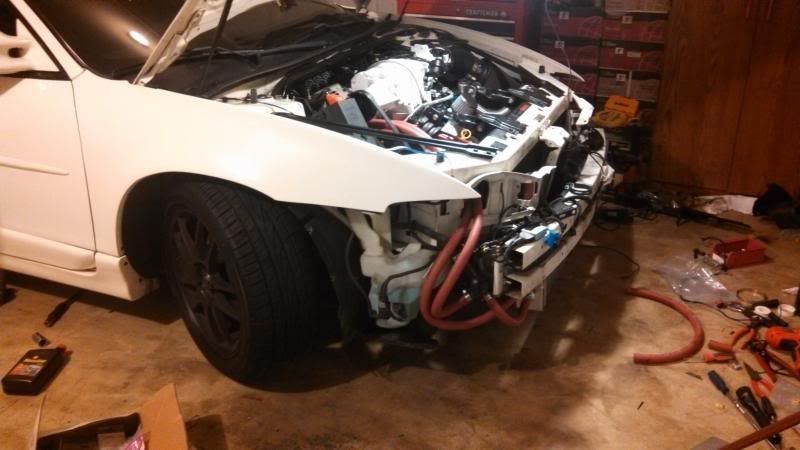
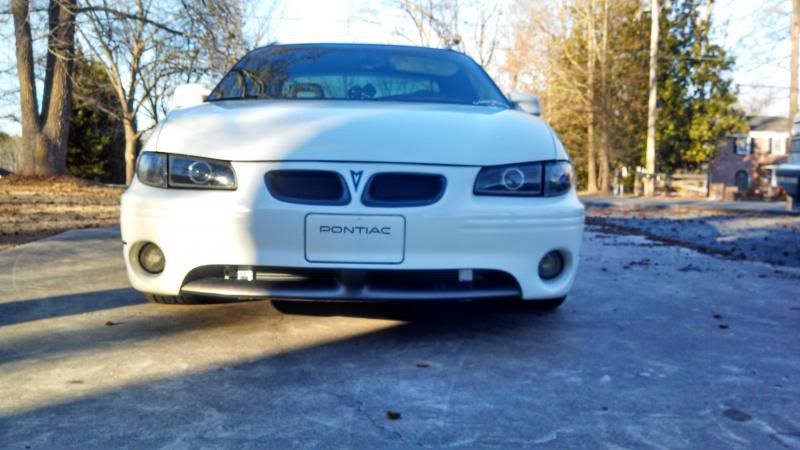
    You'll end up with something like this


    If you have any questions feel free to PM me or post in this thread. Remember to use the search feature if you need an immediate response.
    Last edited by machinegunsquid; 06-29-2014 at 12:27 PM.

    "**** bills. You can live in your car but you can't race your house" -dsmuts
    Want her to stop when she's not looking karate chop her in her crotch that should quiet her for a bit or at the very least put a smile on your face -REDCOMPG
    Reply With Quote  
     

  3. #3 Re: How to install your WBS Intercooler 
    GrandPrix Junkie machinegunsquid's Avatar
    Join Date
    Sep 2008
    Location
    Florida
    Posts
    3,759
    Thanks (Received)
    0
    Likes (Received)
    0
    Dislikes (Received)
    0
    If you want to know how I relocated my coil packs, find my thread on that in the How To section.

    Will provide a link once I'm awesome enough to do that write-up.

    "**** bills. You can live in your car but you can't race your house" -dsmuts
    Want her to stop when she's not looking karate chop her in her crotch that should quiet her for a bit or at the very least put a smile on your face -REDCOMPG
    Reply With Quote  
     

  4. #4 Re: How to install your WBS Intercooler 
    GXP Level Member GrandPrix06GT's Avatar
    Join Date
    Feb 2013
    Location
    Detroit, MI
    Posts
    2,800
    Thanks (Received)
    0
    Likes (Received)
    0
    Dislikes (Received)
    0
    Good stuff man, thank you.
    2006 GT - SD Headers, Overkill, 3.4, ZZP FSIC, Retrofit, Borla Pro XS-DD 09 G8 GT MGM, Kooks Mids Headers, Rotofab, MagnaFlow Exhaust, 3.5" Solo Performance Tips, VMS Tune, 20" Camaros, Quad Retrofit w. Amber Halos, MM CF Grilles, Gxp Diffuser, Red/Onyx Seats & Shifter
    Reply With Quote  
     

  5. #5 Re: How to install your WBS Intercooler 
    GTP Level Member rodguezsciii's Avatar
    Join Date
    Sep 2012
    Location
    19805
    Posts
    722
    Thanks (Received)
    0
    Likes (Received)
    0
    Dislikes (Received)
    0
    sweet how to....I won't be tackling this until spring along with my VS cam....but good to see a clear write up.....
    Reply With Quote  
     

  6. #6 Re: How to install your WBS Intercooler 
    Turbo is the way to go. BillBoost37's Avatar
    Join Date
    Jul 2009
    Location
    W Spfld
    Posts
    26,815
    Thanks (Received)
    53
    Likes (Received)
    90
    Dislikes (Received)
    1
    Nice write up... I prefer opening up the LIM turnaround a little further. When the little cover is installed it has a limited space from the center bar piece to the cover. That looks like it will end up being a restriction point, moreso than the size of the ports on each side of the center bar.
    I drink..so consider that when reading my posts.

    2010 Audi A6 Dual IC's
    Reply With Quote  
     

  7. #7 Re: How to install your WBS Intercooler 
    GTX Level Member
    Join Date
    Aug 2009
    Location
    Ocala, FL
    Posts
    1,420
    Thanks (Received)
    0
    Likes (Received)
    0
    Dislikes (Received)
    0
    Nice write-up, makes me want to buy an intercooler!
    2001 Pontiac Grand Prix GT : Stock and slow and SOLD.
    2001 Pontiac Grand Prix GTP Special Edition
    Reply With Quote  
     

  8. #8 Re: How to install your WBS Intercooler 
    GT Level Member
    Join Date
    Jun 2013
    Location
    Hollywood ,FL
    Posts
    407
    Thanks (Received)
    0
    Likes (Received)
    0
    Dislikes (Received)
    0
    good stuff
    Reply With Quote  
     

  9. #9 Re: How to install your WBS Intercooler 
    SE Level Member
    Join Date
    Nov 2012
    Location
    West Bend, Wisconsin
    Posts
    49
    Thanks (Received)
    0
    Likes (Received)
    0
    Dislikes (Received)
    0
    Very useful. Will be doing either ssic or fsic soon.
    Reply With Quote  
     

  10. #10 Re: How to install your WBS Intercooler 
    Awaiting Confirmation
    Join Date
    Apr 2013
    Location
    cincinnati
    Posts
    2
    Thanks (Received)
    0
    Likes (Received)
    0
    Dislikes (Received)
    0
    just wondering what kind of gains are there with a stock pulley?
    Reply With Quote  
     

  11. #11 Re: How to install your WBS Intercooler 
    Donating Users timboku's Avatar
    Join Date
    Jan 2010
    Location
    Montgomery, IL
    Posts
    994
    Thanks (Received)
    0
    Likes (Received)
    0
    Dislikes (Received)
    0
    Quote Originally Posted by iownehondas View Post
    just wondering what kind of gains are there with a stock pulley?
    Nothing really..whole.point of an intercooler is to.put smaller pulley on to get more boost and reduce kr.

    Sent from my SCH-I545 using Tapatalk
    2002 GTP..DD.. Topswapped Gen V L26, XP cam, Full Size IC, E85, 2.6 Pulley,SD Headers, K&N Intake, N*/Lq4,FP Rewire, TEP Trans, F body Fronts, GXP Rear Brakes, LE Spoiler, AGXs with vogtland springs, bonni gxp rims, Timboku Tuned
    1995 Cutlass Supreme Convertible...Soon to be L32Swapped.....2005 GXP Stock
    Reply With Quote  
     

  12. #12 Re: How to install your WBS Intercooler 
    GrandPrix Junkie SgtMarshal's Avatar
    Join Date
    Feb 2012
    Location
    Kemmerer, Wyoming
    Posts
    4,701
    Thanks (Received)
    10
    Likes (Received)
    25
    Dislikes (Received)
    0
    what did you use for a power source for the pump. I read the how to, but I don't remember seeing that. I was thinking I would use an "Add a Circuit" for my power source and use a fuse which turned on with ignition and off when the vehicle turns off. do you see any problem with that?
    Reply With Quote  
     

  13. #13 Re: How to install your WBS Intercooler 
    GXP Level Member GrandPrix06GT's Avatar
    Join Date
    Feb 2013
    Location
    Detroit, MI
    Posts
    2,800
    Thanks (Received)
    0
    Likes (Received)
    0
    Dislikes (Received)
    0
    Quote Originally Posted by johntremell View Post
    what did you use for a power source for the pump. I read the how to, but I don't remember seeing that. I was thinking I would use an "Add a Circuit" for my power source and use a fuse which turned on with ignition and off when the vehicle turns off. do you see any problem with that?
    Yep, use an add a fuse n I ran mine to my fuel pump in the fuse box under the hood. Also make sure you use a relay

    Sent from my SM-G900T using Xparent Blue Tapatalk 2
    2006 GT - SD Headers, Overkill, 3.4, ZZP FSIC, Retrofit, Borla Pro XS-DD 09 G8 GT MGM, Kooks Mids Headers, Rotofab, MagnaFlow Exhaust, 3.5" Solo Performance Tips, VMS Tune, 20" Camaros, Quad Retrofit w. Amber Halos, MM CF Grilles, Gxp Diffuser, Red/Onyx Seats & Shifter
    Reply With Quote  
     

  14. #14 Re: How to install your WBS Intercooler 
    GrandPrix Junkie SgtMarshal's Avatar
    Join Date
    Feb 2012
    Location
    Kemmerer, Wyoming
    Posts
    4,701
    Thanks (Received)
    10
    Likes (Received)
    25
    Dislikes (Received)
    0
    did you wire the relay in on the pump wiring or the add a circuit wiring? do you remember what size the add a circuit was that you used? sorry for all the questions, I'm trying to get it all worked out before I start the project and find out I don't have all the parts. One of the benefits of living in a small town is that the auto parts and hardware stores don't have an amazing selection.
    Reply With Quote  
     

  15. #15 Re: How to install your WBS Intercooler 
    GT Level Member
    Join Date
    Jun 2013
    Location
    Hollywood ,FL
    Posts
    407
    Thanks (Received)
    0
    Likes (Received)
    0
    Dislikes (Received)
    0
    I just twisted my power wire in with fuel pump relay and added my own relay in between that to the pump
    Reply With Quote  
     

  16. #16 Re: How to install your WBS Intercooler 
    GrandPrix Junkie machinegunsquid's Avatar
    Join Date
    Sep 2008
    Location
    Florida
    Posts
    3,759
    Thanks (Received)
    0
    Likes (Received)
    0
    Dislikes (Received)
    0
    I ran an 'add a fuse' off my fuel pump fuse in the underhood panel.

    Pin 85 is your ground
    Pin 86 is from the 'add a fuse' (switch source)
    Pin 87 is from your battery (power wire)
    Pin 30 is to the Relay (positive)

    Then you ground the other pump wire.

    "**** bills. You can live in your car but you can't race your house" -dsmuts
    Want her to stop when she's not looking karate chop her in her crotch that should quiet her for a bit or at the very least put a smile on your face -REDCOMPG
    Reply With Quote  
     

  17. #17 How to install your WBS Intercooler 
    LaBarge Supercharged sseilmnop's Avatar
    Join Date
    Apr 2010
    Location
    Mercer, Pa
    Posts
    1,766
    Thanks (Received)
    0
    Likes (Received)
    9
    Dislikes (Received)
    0
    Looking at thread and I think there should be RTV where I put red. Otherwise you are creating a vacuum leak on intercoolers with working front PCV or gen 3 superchargers where those ports lead to the throttle body.

    Adapters, Phenolic Intercoolers, Supercharger Parts & TVS2300
    http://stores.ebay.com/QualitySuperchargers
    Reply With Quote  
     

  18. #18 How to install your WBS Intercooler 
    LaBarge Supercharged sseilmnop's Avatar
    Join Date
    Apr 2010
    Location
    Mercer, Pa
    Posts
    1,766
    Thanks (Received)
    0
    Likes (Received)
    9
    Dislikes (Received)
    0

    On WBS, ZZP and my 2" intercooler you had to drill a hole for the rear PCV to line up and work. If you didn't drill the hole you probable didn't notice any problems, your PCV (positive crankcase ventilation) system was just not positive. You have to drill near the red circle.
    Adapters, Phenolic Intercoolers, Supercharger Parts & TVS2300
    http://stores.ebay.com/QualitySuperchargers
    Reply With Quote  
     

  19. #19 Re: How to install your WBS Intercooler 
    SE Level Member
    Join Date
    Nov 2014
    Location
    Vancouver, BC
    Posts
    24
    Thanks (Received)
    0
    Likes (Received)
    0
    Dislikes (Received)
    0
    Hey guys, I made an account specifically to post a question on this write up.

    I have a Gen 3 (Regal) and just installed the ZZP full size IC kit, but I have a huge vac leak around where the intake mates with the IC, and where the IC mates with the SC.

    I have the ported gen 3 intake manifold that retains PCV, and I used their gaskets + gasket sealer.

    I noticed the kit comes with 2 washers for the bolts. I put them on the 2 longer bolts, but not sure if that's where they go.

    Just not sure where to go with the vac leak. I guess it's possible my gasket got warped. If you guys do use gaskets, do you just port the felpro ones? I've heard the garlock ones are crap.
    Reply With Quote  
     

  20. #20 Re: How to install your WBS Intercooler 
    GTX Level Member SnowTh1ef's Avatar
    Join Date
    Aug 2013
    Location
    Sandy, UT
    Posts
    1,471
    Thanks (Received)
    0
    Likes (Received)
    1
    Dislikes (Received)
    0
    zzp's gaskets suck. they always leak, just use RTV.
    04 GTP -HAI, 1.9 rockers.
    Reply With Quote  
     

Page 1 of 3 123 LastLast

Similar Threads

  1. intercooler install
    By jrock in forum General Tech Discussion
    Replies: 3
    Last Post: 06-07-2012, 05:49 AM
  2. intercooler install
    By JROCK1987 in forum General Tech Discussion
    Replies: 32
    Last Post: 02-23-2012, 06:21 AM
  3. intercooler install questions
    By screamingreenmonster in forum General Tech Discussion
    Replies: 12
    Last Post: 05-17-2010, 05:17 PM
  4. How to install stage three intercooler?????
    By GINOSGTP in forum General Tech Discussion
    Replies: 7
    Last Post: 02-25-2009, 07:52 PM
  5. how do you install an intercooler??
    By blowfishRus6 in forum General Tech Discussion
    Replies: 5
    Last Post: 05-25-2008, 12:15 AM
Bookmarks
Bookmarks
Posting Permissions
  • You may not post new threads
  • You may not post replies
  • You may not post attachments
  • You may not edit your posts
  •