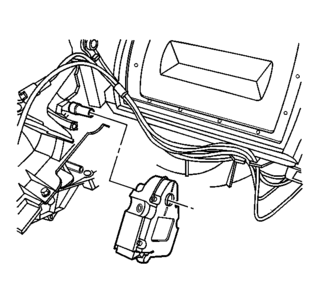
Temperature Actuator Replacement LH
Removal Procedure
1.Remove the left instrument panel insulator (this is the carpeted cardboard piece above the brake pedal that connects to the knee bolster)
2.Remove the knee bolster (this is the pad below the steering column)
3.Remove the steering column filler (this is the metal piece behind the knee bolter, under the steering colum) (4 larger bolts, and I think 2 smaller ones)
4.Disconnect the electrical connector from the temperature actuator.
5.Remove the HVAC Con (HVAC Control) MiniFuse #27 from the IP electrical center.
6.Remove the mounting bolts from the temperature actuator.
7.Remove the temperature actuator.
Installation Procedure
1.Position the temperature actuator, then align the slots in the electric actuator driver to the flats on the temperature valve shaft.
2.Slide the electric actuator driver onto the shaft, while aligning the actuator locating hole to the forward alignment pin on the HVAC module case. The actuator driver should completely seat onto the temperature valve shaft and the mounting holes should be flush with the mounting bosses on the HVAC module case.
3.Install the mounting bolts to the temperature actuator.
Tighten the temperature actuator bolts to 1.5 N·m (13 lb in).
4.Connect the electrical connector to the temperature valve electric actuator.
5.Install the knee bolster.
6.Install the left instrument panel insulator.
7.Install the HVAC Con (HVAC Control) MiniFuse #27 from the IP electrical center.
Temperature Actuator Replacement RH
Removal Procedure
1. Remove the right instrument panel insulator. (The carpeted cardboard piece below the glovebox)
2. Remove the instrument panel compartment. (glovebox)
3. Disconnect the electrical connector from the temperature actuator.
4. Remove the HVAC Con (HVAC Control) MiniFuse #27 from the IP electrical center.
5. Remove the bolts retaining the temperature actuator.
6. Remove the temperature actuator.
Installation Procedure
1. Position the temperature actuator, then align the slots in the electric actuator driver to the flats on the temperature valve shaft.
2. Slide the temperature actuator driver onto the shaft, while aligning the actuator locating holes to the forward alignment pin on the HVAC module case. The actuator driver should completely seat onto the temperature valve shaft and the mounting holes should be flush with the mounting bosses on the HVAC module case.
3. Install the bolts to the temperature actuator. Tighten
Tighten the temperature actuator bolts to 1.5 N·m (13 lb in).
4. Connect the electrical connector to the temperature actuator.
5. Install the instrument panel compartment.
6. Install the right instrument panel insulator.
7. Install the HVAC Con (HVAC Control) MiniFuse #27 from the IP electrical center.


 1998
1998 GTP
GTP


 .
. Two 12 oz cans did it.


