Thread: More Lighted Cupholders! (04+)

Page 1 of 2 12 LastLast
Results 1 to 20 of 39
  1. #1 More Lighted Cupholders! (04+) 
    GTX Level Member Confusingboat's Avatar
    Join Date
    Jan 2010
    Location
    Minnesota
    Posts
    1,071
    Thanks (Received)
    0
    Likes (Received)
    0
    Dislikes (Received)
    0
    Intro:

    My mod was inspired by Abrasive's lighted cupholders, however I opted for a more intricate solution because I have a 2004 with recessed cupholders. I cut two acrylic discs and drilled holes to insert the LEDs into the bottom in a circular array. Here is the end result:

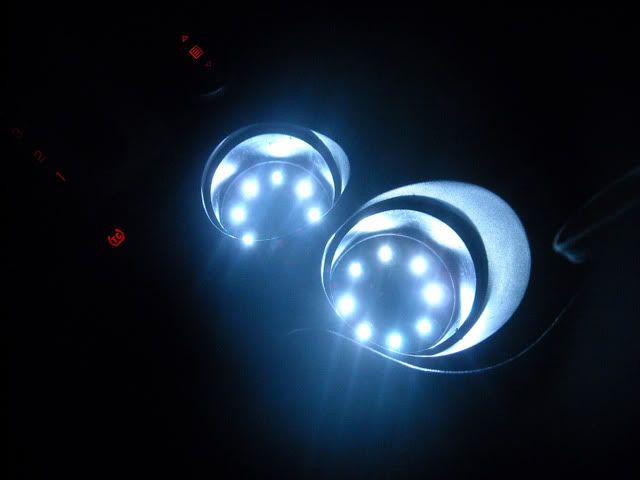
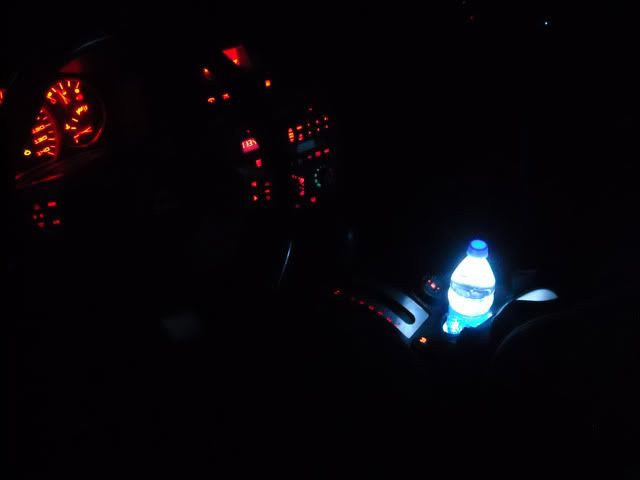
    (The picture makes the bottle look like it glows more than it really does, and I even set the exposure adjustment to -2 on my camera.)

    The LEDs are 17k mcd white -- 8 in each cupholder, each with 4 series of 2 LEDs and 3 100 ohm resistors arranged in parallel. I wired the +12v source into the traction control illumination wire (gray, aka the corner pin) so they only light up when the dash lights come on -- they also fade with the rest of the dash lights if I choose to turn them down. I also wired in a switch, placed in my ash tray next to the switch for my radar detector in case I want to just turn them off.

    Update: I have since upgraded to RGB LEDs and am able to change each LED color individually. There is no reason for this and it's a horse**** design. Though it works fine, I'll be redoing my cupholders in a far more epic fashion when I do ambient lighting for the rest of the car. The color will be the same throughout and it will be computer-controlled via my soon-coming custom carputer infotainment system. Be prepared to get raped by technology.

    Required Items:

    Tools:
    -Soldering iron
    -Drill with 3/16" bit and 2 1/2" hole saw (I would like to have used a drill press but I don't have one or have access to one)
    -RotoZip or similar tool
    -Bench grinder
    -Sandpaper or file
    -Knife
    -Black Sharpie

    Materials:
    -Clear acrylic: enough to cut two circles with ~3" diameter (should be 3/8" thick, or 1/2" thick if not using black plastic bottoms) or get precut discs from TAP Plastics
    -Silicone waterproof sealant
    -Printable drill template for marking holes: downloadable as png or psd
    -Black spray paint or black plastic: enough to paint/cut two circles with ~3" diameter (plastic should be 1/8" thick)
    -If using paint, these are also required:
    -Goof Off or similar paint remover
    -More time
    -Lots of Q-tips
    -Paper towels
    -Patience
    -Solder (duh?)
    -16 white LEDs (5mm, 3.4v, 20mA)
    -8 x 270 ohms worth of resistors (I used 300 ohms because all I had were 100s and 470s)
    -2 5mm x 7mm pieces of breadboard (PCB)


    Instructions:

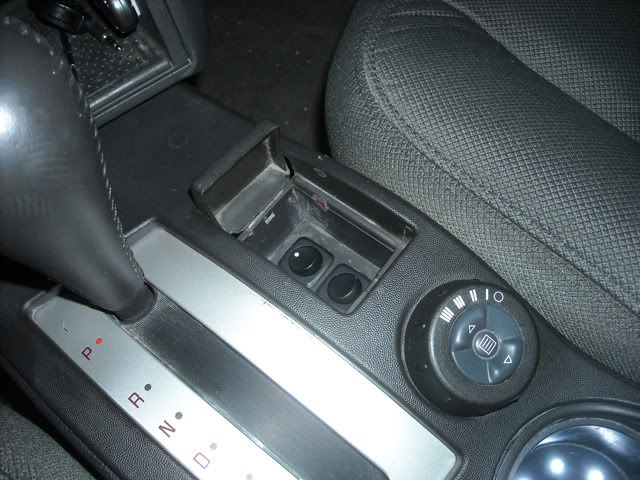
    Step 1 - Remove the center console from your car
    It's pretty much useless trying to do this with it still in, plus it'll allow you to wash it and clean underneath. There are 4 bolts, 2 on each side of the center console (10mm).
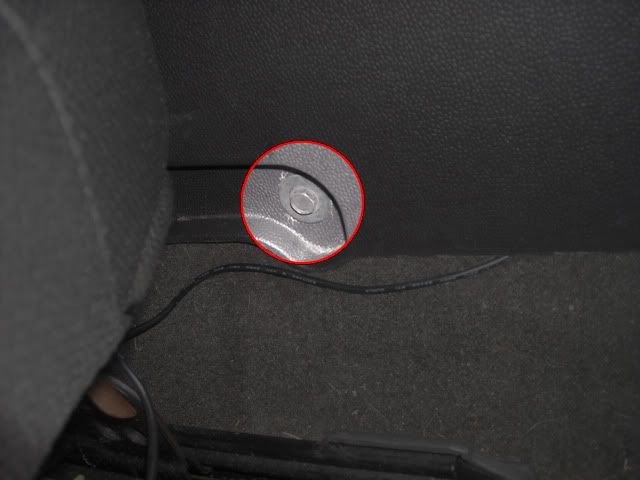


    With the car off, remove these bolts, engage the parking brake and shift the car into 3.
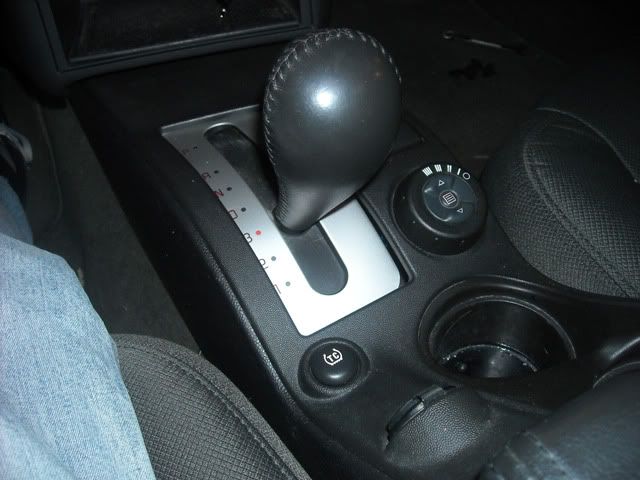


    Pull up on the back of the center console. It's held in by the same clip system as the fuse box cover.
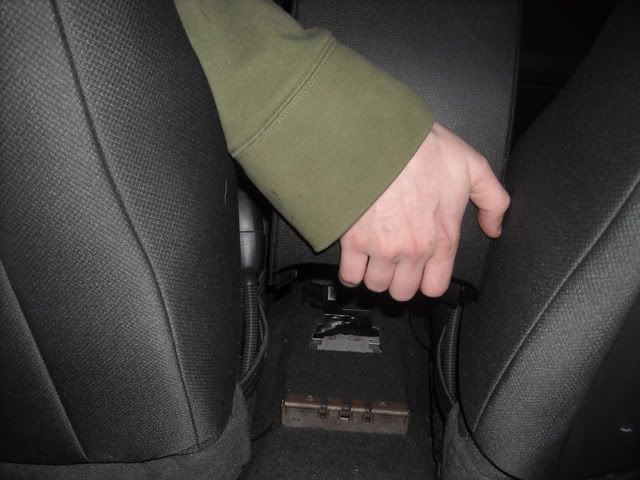


    Then just unplug the harness and you're good to go.
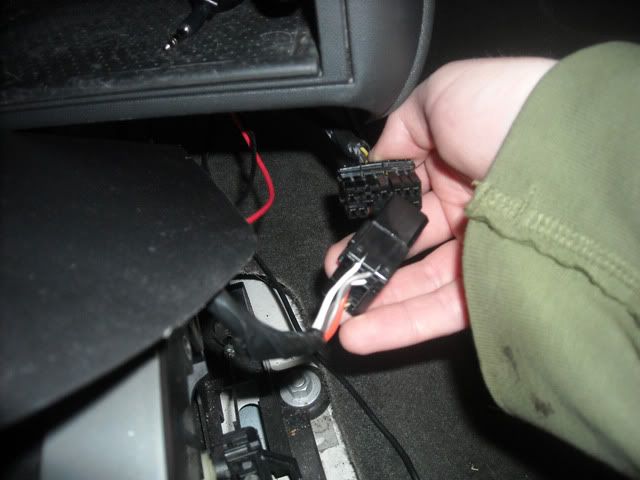


    Step 2 - Disassemble the center console
    It will make it a billion times easier to work on this. There are torx screws all along both sides underneath the center console. Flip it upside-down and remove them all, they are torx size T-15.
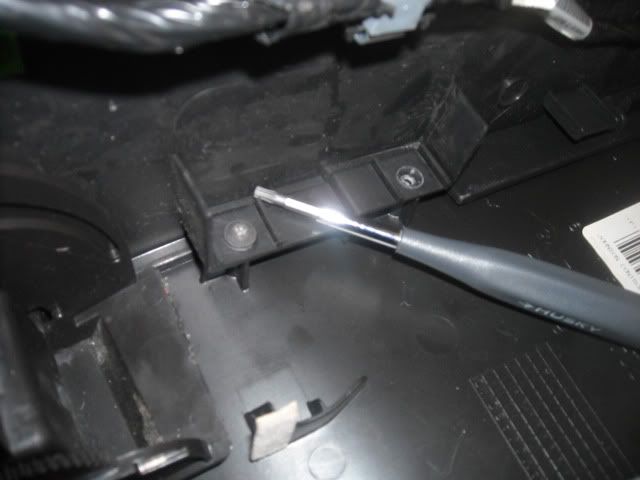


    Step 3 - Cut out the bottoms of the cupholders
    Now the real work begins. Using the 2 1/2" hole saw, cut out a circle in the center of both cupholders, leaving approximately 1/4" lip to hold the acrylic insert. This hole is for the electronic components that go underneath the insert.
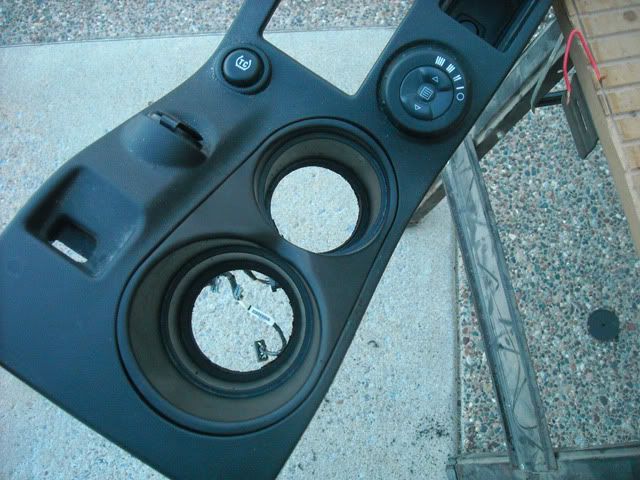


    Step 4 - Cut out the acrylic discs
    The approximate diameter of the disc inserts is 2.95" -- I used a can of spray paint to trace because it fit perfectly inside the cupholders, and marked with a Sharpie. Then, using the RotoZip, cut out the discs making sure not to go too slow so you don't burn the edges of the acrylic.
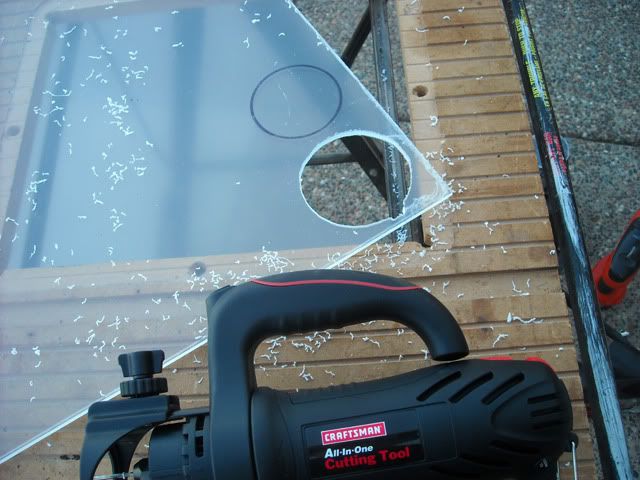


    Use the bench grinder to carefully sand the edges for a perfect fit. You'll want the discs so that they fall almost all the way down to the bottom of the cupholder without any force, but should be snug at the bottom (removing the cupholder insert from the top center console piece helps during this process).

    Step 5 - Create a dark underside for the acrylic inserts
    Once you have your fancy-shmancy acrylic inserts custom cut to your cupholders, you need to create an opaque underside so the electronic components don't show through (you could also fog up the bottom with sandpaper I suppose). If you are opting to use plastic (which is the best way imo), then you need to repeat the process from step 4, but with the black plastic -- you may then skip to step 6a.

    For all you painters, you will need to apply several coats of black spray paint to one of the sides of the acrylic inserts, then proceed to step 6b.

    Step 6 - Drill holes for the LEDs
    A) Plastic:
    Line up the drill template that you should've printed at this point (if you haven't done so, then do it now) and use a screw or other sharp pointy object to make dots on the black plastic -- this is where you will drill the holes. Then, place the black plastic insert on top of an acrylic insert and secure them so they don't move around, but keep in mind that you need to drill these things. Once you have them so they won't move, proceed to drill a hole at each mark using the 3/16" drill bit, and also using an LED as a depth measurement. The bottom (lead side) should not submerge into the plastic; it should either be flush or have the lip resting around the hole. Remember, these holes do not go all the way through the acrylic.
    B) Paint:
    Since you chose to paint, I hope you chose 1/2" thick acrylic or you'll have to be a lot more careful when drilling to make sure you don't go all the way through. Line up the drill template that you should've printed at this point (if you haven't done so, then do it now) and use a screw or other sharp pointy object to make dots in the black paint -- this is where you will drill the holes. Use an LED as a depth measurement, gauged against the side of the acrylic and marked with a Sharpie. Proceed to drill a hole at each marking with the 3/16" drill bit. Remember, these holes do not go all the way through the acrylic.
    Step 7 - Assemble the LED array
    It is time to assemble the LED array. However you do it, just make sure you place the LEDs correctly before soldering -- nothing would piss you off more than to have to redo the whole thing. Here is the recommended configuration:
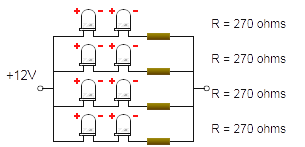


    You will need to make two of these, one for each cupholder. Make sure there's about 6 inches of slack wire for each positive and ground lead so you can comfortably connect them after they're installed, and also make sure that they are not secured directly at or very near the edge of the acrylic or you will have difficulties getting them into the cupholders.

    Step 8 - Assembling the Cupholders
    It's finally time to see your plan come to fruition. If you opted for the recommended method of using black plastic bottoms, insert those into the cupholders first. Then insert the clear acrylic into the bottom of the cupholders (hole side down of course). They should be snug enough to stay in place while allowing you to flip the whole console upside-down (don't worry if they're not, you'll need to hold them in place anyways). You then take the LED array and position it so the LEDs are in the holes, and hot glue (or otherwise attach) it to the underside of the cupholder. Repeat the process for the second cupholder. Now just wire up the common leads together, and tap into one of the cigarette lighter sockets for ground, and into the corner pin (illumination pin) on the traction control button for the positive feed. It's usually recommended that you split the ground for the switch, but in this case it really doesn't make any difference. Now just flip the console back so it's right-side up, and apply the silicon sealant to the edges of the clear acrylic. Make sure to get it nice and smooth to give it a polished finish -- no need to half-ass things now.

    Step 9 - Reinstall Console
    All that's left to do now is reassemble and reinstall the center console and plug in the wiring harness. No need to worry about the cupholder wiring as it's all self-contained (as long as you secured it properly so it doesn't flop all over the place). See the instructions for disassembling for more intricate details, just do them in the reverse order.

    Complete
    Congratulations, you now have lighted cupholders! Enjoy your finished product by putting a lightly colored (or clear) beverage with a clear (or near clear) container in the cupholder and light it up.
    Last edited by Confusingboat; 02-28-2011 at 08:37 PM.
    2004 Grand Prix GT2 - SOLD
    2015 Evo MR
    Reply With Quote  
     

  2. #2 Re: More Lighted Cupholders! 
    GrandPrix Junkie CTKGP09's Avatar
    Join Date
    May 2009
    Location
    Willoughby, Ohio
    Posts
    3,831
    Thanks (Received)
    0
    Likes (Received)
    0
    Dislikes (Received)
    0
    looks clean man, nice work
    '04 Chevy Silverado LT 4x4 - intake, headers, full exhaust, zo6 cam, 799 heads, tune, leveled, 33's
    '00 Grand Prix GTP DAYTONA 500 - L36 block, S1X, intercooled, GenV, N*, headers, full exhaust, coilovers, 5 speed swap, stage 3+ clutch
    Reply With Quote  
     

  3. #3 Re: More Lighted Cupholders! 
    GTX Level Member noreasonwhyy's Avatar
    Join Date
    Mar 2010
    Location
    Michigan
    Posts
    994
    Thanks (Received)
    0
    Likes (Received)
    0
    Dislikes (Received)
    0
    ^x2. any reason you didn't use red LEDs?

    97 GT - slow, rusty
    93 CTD - more slow, less rust
    Reply With Quote  
     

  4. #4 Re: More Lighted Cupholders! 
    Donating Users Lawngoose's Avatar
    Join Date
    Dec 2007
    Location
    Outer Space
    Posts
    1,250
    Thanks (Received)
    0
    Likes (Received)
    0
    Dislikes (Received)
    0
    Quote Originally Posted by noreasonwhyy View Post
    ^x2. any reason you didn't use red LEDs?
    That is what I was thinking. However, great job. Have you thought about scuffing the acrylic up any?
    02 GTP 13.6 @ 100mph - SOLD
    Reply With Quote  
     

  5. #5 Re: More Lighted Cupholders! 
    GTX Level Member Confusingboat's Avatar
    Join Date
    Jan 2010
    Location
    Minnesota
    Posts
    1,071
    Thanks (Received)
    0
    Likes (Received)
    0
    Dislikes (Received)
    0
    Well I figured if I used red it wouldn't match the hue of the dash lighting, plus the white matches the LEDs in my map lights, foot wells, and rear courtesy lights so it still works. If I really want I can just put a piece of red acrylic over the bottom.

    I'm thinking of redoing them by with pcb instead of loose wiring underneath anyways, so I might just get some full-spectrum RGB LEDs to use so I can choose any color I want.

    I was also thinking of scoring the surface, but I thought a nice crystal clear finish would look nicer.
    2004 Grand Prix GT2 - SOLD
    2015 Evo MR
    Reply With Quote  
     

  6. #6 Re: More Lighted Cupholders! 
    The LED guy.... csssaint12's Avatar
    Join Date
    Nov 2009
    Location
    Duluth, Minnesota, United States
    Posts
    741
    Thanks (Received)
    0
    Likes (Received)
    0
    Dislikes (Received)
    0
    damn dude u went all out on the leds. i just put one in each of my cupholders when i did it and i thought the bottles shined then. Can't imagine how they shine with that many leds. Could you get a pic of a bottle sitting in the cupholders with the lights on?
    Reply With Quote  
     

  7. #7 Re: More Lighted Cupholders! 
    GrandPrix Junkie The Guz's Avatar
    Join Date
    Dec 2008
    Location
    Lawndale, CA
    Posts
    3,007
    Thanks (Received)
    3
    Likes (Received)
    9
    Dislikes (Received)
    0
    Looks good. You should post your pics in the existing write up on what you did or a new one.
    1999 GP GT 18" Boss 353 Concave|SLP CAI|Borla Cat Back|Plog|HV3|HV TB|ER Rockers|Custom Retrofit Projectors|GMPP Lowering|GMPP Handling|MPD F1|Full Diode Dynamic LEDs
    Reply With Quote  
     

  8. #8 Re: More Lighted Cupholders! 
    GXP Level Member rocafella2032's Avatar
    Join Date
    Mar 2009
    Location
    Norristown, PA
    Posts
    2,606
    Thanks (Received)
    0
    Likes (Received)
    0
    Dislikes (Received)
    0
    put a bottle in one and take a picture
    Reply With Quote  
     

  9. #9 Re: More Lighted Cupholders! 
    GTX Level Member Confusingboat's Avatar
    Join Date
    Jan 2010
    Location
    Minnesota
    Posts
    1,071
    Thanks (Received)
    0
    Likes (Received)
    0
    Dislikes (Received)
    0
    I have added a picture of my glowing Dasani water bottle due to popular demand. A write-up will follow shortly, after I get all my **** together -- btw, it is CONFIRMED that I am redoing the wiring with PCB to make it as rock solid as possible, I will also be adding a wiring harness for easy removal, so this write-up is subject to change in approximately 3 weeks.
    2004 Grand Prix GT2 - SOLD
    2015 Evo MR
    Reply With Quote  
     

  10. #10 Re: More Lighted Cupholders! 
    The LED guy.... csssaint12's Avatar
    Join Date
    Nov 2009
    Location
    Duluth, Minnesota, United States
    Posts
    741
    Thanks (Received)
    0
    Likes (Received)
    0
    Dislikes (Received)
    0
    great job dude. the bottle glows super BRIGHT!!!
    Reply With Quote  
     

  11. #11 Re: More Lighted Cupholders! 
    GTX Level Member noreasonwhyy's Avatar
    Join Date
    Mar 2010
    Location
    Michigan
    Posts
    994
    Thanks (Received)
    0
    Likes (Received)
    0
    Dislikes (Received)
    0
    that bottle shot is legit.

    97 GT - slow, rusty
    93 CTD - more slow, less rust
    Reply With Quote  
     

  12. #12 Re: More Lighted Cupholders! 
    GTX Level Member Confusingboat's Avatar
    Join Date
    Jan 2010
    Location
    Minnesota
    Posts
    1,071
    Thanks (Received)
    0
    Likes (Received)
    0
    Dislikes (Received)
    0
    I ordered some RGB LEDs and I'm gonna add in a trimmer for each color, so I can set a non-white color (in this case red, but will be able to change it if I change the color of my dash lights) that will toggle between it and pure white.
    2004 Grand Prix GT2 - SOLD
    2015 Evo MR
    Reply With Quote  
     

  13. #13 Re: More Lighted Cupholders! 
    GrandPrix Junkie CTKGP09's Avatar
    Join Date
    May 2009
    Location
    Willoughby, Ohio
    Posts
    3,831
    Thanks (Received)
    0
    Likes (Received)
    0
    Dislikes (Received)
    0
    that bottle looks sick, you should keep water in your car for your friends at all times
    '04 Chevy Silverado LT 4x4 - intake, headers, full exhaust, zo6 cam, 799 heads, tune, leveled, 33's
    '00 Grand Prix GTP DAYTONA 500 - L36 block, S1X, intercooled, GenV, N*, headers, full exhaust, coilovers, 5 speed swap, stage 3+ clutch
    Reply With Quote  
     

  14. #14 Re: More Lighted Cupholders! 
    Donating Users coreygnar's Avatar
    Join Date
    Mar 2010
    Location
    Arizona
    Posts
    1,668
    Thanks (Received)
    0
    Likes (Received)
    0
    Dislikes (Received)
    0
    i think you have holy water in your cupholder
    '00 GT- nothing special
    My only advice: Don't take my advice

    Reply With Quote  
     

  15. #15 Re: More Lighted Cupholders! 
    GTP Level Member Colossus's Avatar
    Join Date
    Sep 2009
    Location
    Windsor (ON) Canada
    Posts
    1,071
    Thanks (Received)
    0
    Likes (Received)
    0
    Dislikes (Received)
    0
    Quote Originally Posted by coreygnar View Post
    i think you have holy water in your cupholder


    Looks real clean...red would look sik though.

    Reply With Quote  
     

  16. #16 Re: More Lighted Cupholders! 
    SE Level Member
    Join Date
    Jul 2010
    Location
    Wisconsin
    Posts
    24
    Thanks (Received)
    0
    Likes (Received)
    0
    Dislikes (Received)
    0
    Can't wait for the finished write up, maybe add pics/diagrams to it just to make everything simpler.

    Also, the black plastic, couldn't you use what you cut out from the bottom of the cupholder?
    Reply With Quote  
     

  17. #17 Re: More Lighted Cupholders! 
    GTP Level Member OrangeL67's Avatar
    Join Date
    Nov 2009
    Location
    Michigan
    Posts
    634
    Thanks (Received)
    0
    Likes (Received)
    0
    Dislikes (Received)
    0
    Thats dope

    VS cam build 13.01@107 316whp/ XP build #1 12.78@110 334whp/ XP build #2 12.56@113 347whp
    IS3 Cam build (Ready to put out some serious numbers)
    Reply With Quote  
     

  18. #18 Re: More Lighted Cupholders! 
    GTX Level Member cerick08GP's Avatar
    Join Date
    Sep 2009
    Location
    Wisconsin
    Posts
    782
    Thanks (Received)
    0
    Likes (Received)
    0
    Dislikes (Received)
    0
    Quote Originally Posted by Confusingboat View Post
    Step 1 - Remove the center console from your car
    It's pretty much useless trying to do this with it still in, plus it'll allow you to wash it and clean underneath. There are 4 bolts, 2 on each side of the center console (10mm). With the car off, remove these bolts, engage the parking brake and shift the car into 1, and yank the center console off. It's held in by the same clip system as the fuse box cover. Then just unplug the harness and you're good to go.

    Now I feel like a dork. I twice attempted the same mod on my car this summer. For the life of me I couldn’t pop off the center console, I used enough force to nearly break it. Could you please elaborate on your methodology?
    The only difference I noticed between our approachs is that you used 1st gear, and recall using 2nd? Some how I don’t think that was my only failing.


    I still have all my LEDs and such ready to go in.


    Ten years of continuous driving excitement and counting!
    2008GP
    ||HV3 insert||PowerSlot rotors w/Hawks||LED interior||MSD 8.5mm
    2002GP||sold
    Reply With Quote  
     

  19. #19 Re: More Lighted Cupholders! 
    GT Level Member
    Join Date
    Aug 2009
    Location
    canada
    Posts
    307
    Thanks (Received)
    0
    Likes (Received)
    0
    Dislikes (Received)
    0
    looks good man. well done. personally I would have gone with red leds to match dash. mmmmm now I will be thinking about this type of project
    Reply With Quote  
     

  20. #20 Re: More Lighted Cupholders! 
    GTX Level Member Confusingboat's Avatar
    Join Date
    Jan 2010
    Location
    Minnesota
    Posts
    1,071
    Thanks (Received)
    0
    Likes (Received)
    0
    Dislikes (Received)
    0
    Quote Originally Posted by Scal24 View Post
    Can't wait for the finished write up, maybe add pics/diagrams to it just to make everything simpler.

    Also, the black plastic, couldn't you use what you cut out from the bottom of the cupholder?
    Still working on the write-up, and you couldn't use what you cut out of the bottom because it won't cover the whole bottom of the acrylic. If you're ok with that then I guess you could try it out though lol.

    And cerick08GP, I'll take some pics of me removing it for you when I take it out again to install the new and improved LEDs. For what it's worth, the clips are in the same spot you take the bolts out of, so pull on those areas (there are 2 in the front and 2 in the back). Also, you have to pull it out because there's a little notch in the front of it that hooks around some cylindrical knob.
    Last edited by Confusingboat; 10-19-2010 at 12:06 AM.
    2004 Grand Prix GT2 - SOLD
    2015 Evo MR
    Reply With Quote  
     

Page 1 of 2 12 LastLast

Similar Threads

  1. My Latest Mod - Lighted cupholders
    By Abrasive in forum Audio, Security & Visual Electronics
    Replies: 70
    Last Post: 05-20-2013, 05:01 PM
  2. Lighted Vents & Cupholders
    By ohioGTP in forum Audio, Security & Visual Electronics
    Replies: 12
    Last Post: 07-24-2009, 04:14 PM
Tags for this Thread

View Tag Cloud

Bookmarks
Bookmarks
Posting Permissions
  • You may not post new threads
  • You may not post replies
  • You may not post attachments
  • You may not edit your posts
  •