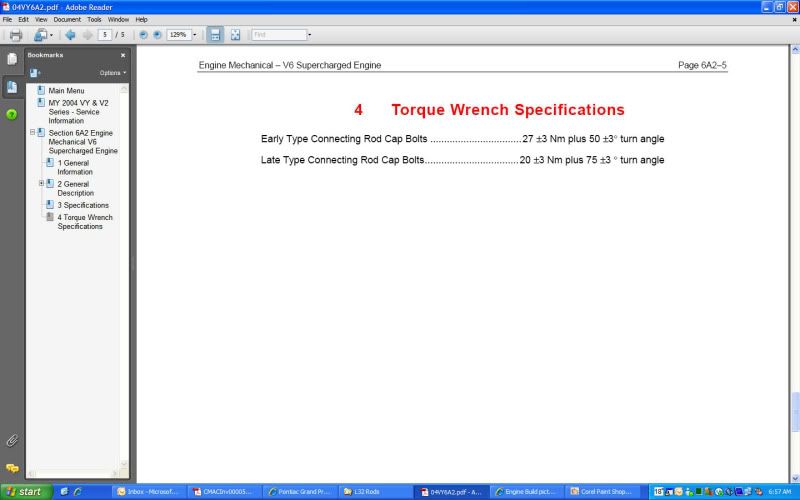
Anyone know?
Cheers.
|
|

Anyone know?
Cheers.

Fastener Tightening Specifications
Application
Metric
English
Accelerator Control Cable Bracket Bolt
16 N-m
12 lb ft
Air Injection Check Valve Pipe to Exhaust Manifold
10 N-m
89 lb in
Air Injection Check Valve to Bracket Bolt
25 N-m
18 lb ft
Balance Shaft Driven Gear Bolt
22 + 70° N-m
16 + 70° lb ft
Balance Shaft Retainer Bolt
30 N-m
22 lb ft
Camshaft Position Sensor Bolt
10 N-m
89 lb in
Camshaft Sprocket Bolt
100 + 90° N-m
70 + 90° lb ft
Camshaft Thrust Plate Bolt
15 N-m
11 lb ft
Canister Purge Solenoid Valve Bracket Bolt
50 N-m
37 lb ft
Canister Purge Vacuum Switch Bolt
50 N-m
37 lb ft
Connecting Rod Cap Bolt
27 + 50° N-m
20 + 50° lb ft
Crankshaft Balancer Bolt
150 + 76° N-m
111 + 76° lb ft
Crankshaft Main Bearing Cap Bolt
40 + 110° N-m
30 + 110° lb ft
Crankshaft Main Bearing Cap Bolt (Side)
15 + 45° N-m
11 + 45° lb ft
Crankshaft Position Sensor Stud
30 N-m
22 lb ft
Crankshaft Rear Oil Seal Housing Bolt
15 + 50° N-m
11 + 50° lb ft
Cylinder Head Bolt
50 + 120° N-m
37 + 120° lb ft
Drive Belt Tensioner Bracket Bolt/Nut
50 N-m
37 lb ft
Drive Belt Tensioner Bracket Stud
6 N-m
53 lb in
EGR Valve Adapter Bolt/Stud
50 N-m
37 lb ft
EGR Valve Inlet Pipe Bolt
29 N-m
21 lb ft
EGR Valve Nut
30 N-m
22 lb ft
EGR Valve Outlet Pipe Bolt/Nut
29 N-m
21 lb ft
Engine Block Coolant Drain Plug
30 N-m
22 lb ft
Engine Block Oil Gallery Plug
30 N-m
22 lb ft
Engine Coolant Temp Sensor
23 N-m
16 lb ft
Engine Flywheel Bolt
15 + 50° N-m
11 + 50° lb ft
Engine Front Cover Bolt Stud
20 + 40° N-m
15 + 40° lb ft
Engine Lift Bracket Bolt/Nut./Stud
30 N-m
22 lb ft
Engine Mount Nut Lower
78 N-m
58 lb ft
Engine Mount Nut Upper
78 N-m
58 lb ft
Engine Oil Pressure Indicator Switch
16 N-m
12 lb ft
Engine Wiring Harness Heat Shield Nut/Bolt
10 N-m
89 lb in
Exhaust Crossover Heat Shield Nut
20 N-m
15 lb ft
Exhaust Crossover Pipe Bolt/Stud
18 N-m
13 lb ft
Exhaust Manifold Bolt/Nut
30 N-m
22 lb ft
Exhaust Manifold Stud (Inner)
30 N-m
22 lb ft
Exhaust Manifold Stud (Outer)
10 N-m
89 lb in
Fuel Injector Rail Nut
10 N-m
89 lb in
Fuel Injector Rail Stud
25 N-m
18 lb in
Fuel Injector Sight Shield Bracket Nut
30 N-m
22 lb ft
Generator Brace Bracket Bolt
50 N-m
37 lb ft
Heated Oxygen Sensor
42 N-m
31 lb ft
ICM Nut
50 N-m
37 lb ft
ICM Stud
6 N-m
53 lb in
ICM Wiring Harness Bolt
2 N-m
18 lb in
Idler Pulley Bolt
50 N-m
37 lb ft
Idler Pulley Bracket Bolt
30 N-m
22 lb ft
Lower Intake Manifold Bolt
15 N-m
11 lb ft
Oil Cooler Adapter Connector
50 N-m
37 lb ft
Oil Filter
30 N-m
22 lb ft
Oil Filter Adapter Bolt
15 + 50° N-m
11 + 50° lb ft
Oil Level Indicator Switch
20 N-m
15 lb ft
Oil Level Indicator Tube Nut
19 N-m
14 lb ft
Oil Pan Bolt
14 N-m
125 lb in
Oil Pan Drain Plug
30 N-m
22 lb ft
Oil Pump Cover Screw
11 N-m
98 lb in
Oil Pump Screen Bolt
15 N-m
11 lb ft
Power Brake Booster Heat Shield Nut
20 N-m
15 lb ft
Spark Plug
27 N-m
20 lb ft
Starter Motor Heat Shield Bolt
30 N-m
22 lb ft
Throttle Body Nut
10 N-m
89 lb in
Throttle Body Support Bolt
10 N-m
89 lb in
Throttle Body Support Stud
6 N-m
53 lb in
Timing Chain Dampener Bolt
22 N-m
16 lb ft
Upper Intake Manifold Bolt/Stud
10 N-m
89 lb in
Vacuum Solenoid Valve bolt (with NC1 California Emissions)
10 N-m
89 lb in
Valve Lifter Guide Retainer Bolt
30 N-m
22 lb ft
Valve Rocker Arm Bolt
15 + 90° N-m
11 + 90° lb ft
Valve Rocker Arm Cover Bolt
10 N-m
89 lb in
Water Outlet Bolt
27 N-m
20 lb ft
Water Pump Bolt
15 + 80° N-m
11 + 80° lb ft
Water Pump Pulley Bolt
13 N-m
116 lb in
Wiring Harness Shield Bolt/Nut
10 N-m
89 lb in


Thanks guys but arent those specs for L67?
Ive done my bolts to 22nm + 70deg. Somebody told me thats what was in his workshop manual for L32 and im just making sure.
Last edited by Bio248; 03-14-2011 at 08:01 AM.

gpona.com has the GM service manual.
You need to plastiguage it anyways.Install the connecting rod bearing cap bolts.
Tighten
Tighten the connecting rod bearing cap bolts to 27 N·m (20 lb ft) + 50 degrees using J 45059 .
Have you done that yet?

No, i torqued the rods up outside of the motor and used an inside micrometer.
I probably should mention im from australia before i go any further lol.
Here is AUS the L32 rods came out in our L67 from late 2003 to late 2004.
Here is our service manual.
The ''Early'' type rods are the L67 and the ''Late'' rods are the L32's.
Mind you i bought the L32 rods from the U.S.
I think the only difference with torqueing the bolts is the main caps squashing in more or less depeding on what setting used. Im just worried the bolts might snap under load from being too tight.
What do you guys think?


I'll tell you another thing.
I replaced the original bolts because i had a few problem with the build, the old bolts got torqued too many times. GR8racingfool was kind enough to give me his un-used bolts as he went to ARP's.
Problem was that his L32 bolts were slightly different to my L32 bolts (Only really the flanges under the hex is slightly smaller) and were 2.3 grams lighter which will now not only throw my full engine balance out slightly.
This makes me worry that there are different part numbers for L32 rod bolts and different torque settings...
But if the bolts can handle the extra torque and are just designed to give the cap more squash then it shouldnt be a problem as ive measured the rods while using the tighter torque setting.
My original bolts are on the right.


the whole world uses plastiguage it takes some time to put together and take apart and put back together, but well worth the time, some times the new bearing is fvcked up and no micrometer is going to tell you that.

So you reckon the extra torque setting is to close the bore slightly more?

Replied to your PM.
Connecting Rod Cap Bolt
27 + 50° N-m
20 + 50° lb ft
is what I follow on stock bolts, but like you said I went with ARPs and I followed their specks.
I always use plastiguage, takes but a few minutes to save a wold of headaches.
When I built my engine, I removed the L23 rods bolts, from my brand new rods and installed my ARPs and then took them to the machine shop so they could line hone them straight and true again because the different bolts will change the shape of the rod some because of the different torque.
Stock rods, with the stock bolts, its a good idea to have this dome as well, install the bolts, torque them, and degree them, and have them honed. Though the bolts are TTY and "one time use" You should be fine running them in the engine after this is done. You haven't "used them" for say, but you have to torque them, and stress the cap/bolts to get a true and perfect circle as if it were installed on the crank. From the factory brand new, this is already done to the rods, I would assume...but it never hurts to for sure follow through.
~F~

| « Previous Thread | Next Thread » |
| Tags for this Thread |