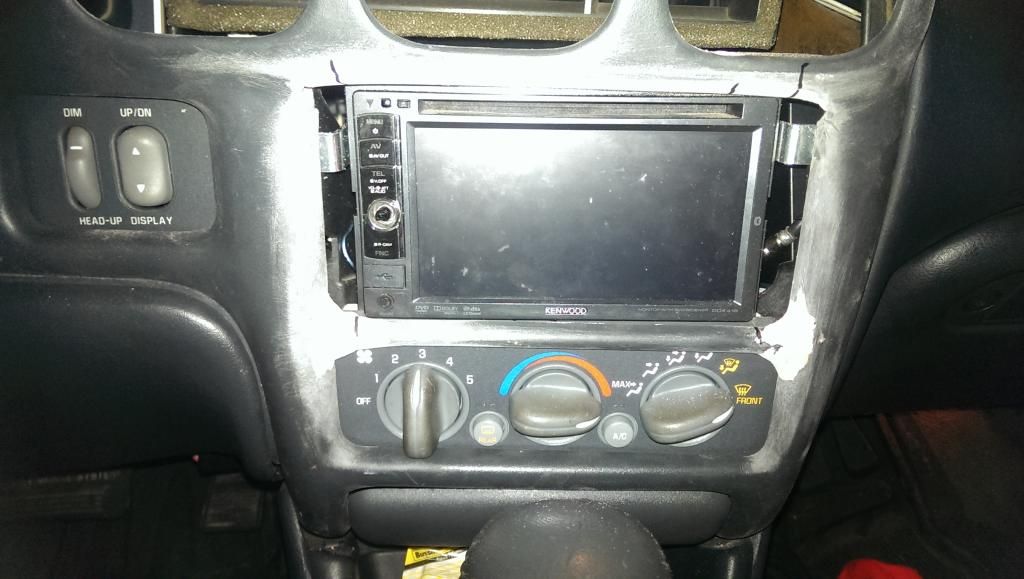
As we know, a Grand Prix doesn't properly allow for a double din, it only accepts a single din, but some of us still want the "cool" factor of having a double din and all the nifty features it comes with. So you go out and buy one, like I did. I purchased a Kenwood ddx418 6.1" radio. When to install it, and it looks like this:
EW right?! With my personality, this wasn't going to fly and something needed to be done so it looks factory. At this point, you have multiple options.
1: Keep it the way it is and have it look ugly.
2: Some people just put some plastic that is the same color of the dash on each side of the radio to fill in the gaps. Still looks ugly, but better none the less.
3: You can purchase a bezel professionally modified by a company already. But it's a generic size, so who knows if it will fit exactly to your size double din, and the price is ridiculous, but here you go anyways: http://shop.doubledmods.com/Pontiac-...rixDDbezel.htm
4: You can modify it yourself, so it has the perfect fit to your size double din and at least you can say you did it yourself.
Which ever option floats your boat, go for it. But for me, I went with #4 obviously, and creating this write-up to show you what I did.
I have only tried body work ONCE in my life and this tedious work really isn't for me, but I wanted to try it anyways. This is the first and probably only time I will ever do this. Mistakes were made, so bare with me. AND if I can do it on the first try with about zero body work experience, anyone can do it. Just give yourself a few days and do not rush. This took me about 4 days.
*As a side note, mine DID NOT come out perfect and how your finished product ends up, is based off your skill. I am more creating this write-up as a guideline to see whats done. There are many ways to modify your dash, but this is the way I did it. Don't like it, don't listen to what I have to say and how I did and carry on to the thread somewhere on this forum. Without further ado, shall we begin?
Here are the supplies I used:
- Dowel Sticks (I got multiple sizes from Lowes just encase).
- Bondo Body Filler (I went through two tubs of it because I used A LOT of bondo, but the majority got sanded off. In the picture is shows glazing/spot puddy - don't even bother buying that, so ignore that).
- Bondo Hardening Cream
- Dremel with sanding and cutting wheel
- Drill
- Heat gun (Not Required)
- Super Glue
- Extra dash from the junk yard (Not Required)
- ABS Cement. (I never used it, so don't bother)
- Sand paper.
- Primer
- Paint (Charcoal Dark Gray Plast-Dip. It's what I used, but you can use whatever you want. https://www.dipyourcar.com/PlastiDip-Spray-All.html).
- 90 degree mounting tabs for shelves to mount your Double Din (As mine didn't line up with the stock holes for mounting a radio).
Step 1, Mounting the Radio. You can skip this step if you already mounted your radio where you want it.
I used 2" 90 degree shelf mounting hardware from Lowes. You can see the Sharpie line on the hardware where I need to cut the excess off and also the "dot" on the left side showing where I need to drill a new hole.
When that is finished, drill small holes into the plastic of where the stock radio screw holes are. Creating a new mounting spot for the screws. When that's done, your finished mounting your Double Din. MAKE SURE YOU HAVE EXACTLY WHERE YOU WANT BEFORE YOU BEGIN WORKING ON THE DASH!
Step 2: Now at this point I created a template of the exact size of my radio. I ended up rarely using it, but it's just nice to have as a reference.
Step 3: Moving the bar between the radio and the HVAC. I made some sharpie lines on the dash where the radio ends.
Time to cut the middle bar out:
All Done:
I also need to cut up by the vents since it was covering up the top of my double din, here is the line I made with the Dremel:
And cut off (I also sanded the sides of the dash where I cut the "Middle Bar" off quite a bit so it was nice and smooth and sanded the top where I cut so that was smooth and even as well):
I reinstalled the dash, and made some sharpie lines where the "Middle Bar" needs to be molded in:
Step 4: Molding in the "Middle Bar." I used a 1/4 dowel stick and mounted it behind the "middle bar" (Your dash opening on the sides will now be wider than normal where the "middle bar" can't reach anymore from all the sanding. That's why this dowel stick is needed).
I super glued it in place to hold it before I applied Bondo to it.
I put a lot of bondo on the back to reinforce it first, then applied a lot to the edges on the front. After drying for awhile your ready to sand. (A heat gun really helps on the bondo drying faster so you aren't waiting around as long).
Double checking it's placed where I want it: (Be careful installing and removing the dash after your custom work. The dash will not be as strong as stock obviously, and you do not want the bondo to crack. Hence why I made a template to prevent this as much as possible. Do at your own risk.
Now at the top, I needed to add some more area to where I cut out, and smooth it back down. Once again, I glued a dowel stick there added a bunch of bondo between the dowel stick and the dash and then sanded:
You can see all the little holes in the bondo on the picture above ^ so now you need another layer of bondo, by using a putty knife to fill in.
Here is where you should be at this point:
Reinstalled to check fitment, and re-draw more lines on the dash where the radio is.